JDK Mission Control 9.1.0 Released!

The source release of JMC 9.1.0 was tagged 2025-01-31. As per usual it may take some time until vendors have binary builds of JDK Mission Control available.

Here are the release notes:

Mission Control 9.1 – New and Noteworthy


General


JMC 9.1 – New Release!
This is the latest (January 2025) release of JDK Mission Control. JMC 9.1 requires JDK 21+ to run and introduces several new features, enhancements, and bug fixes. This version continues to support connecting to, and parsing JFR recordings from, OpenJDK 8u272+ and Oracle JDK 7u40+, and can open and visualize flight recordings from JDK 7 and 8. JDK Mission Control is available for Windows (x86_64), Mac OS X (ARM and x86_64), and Linux (ARM and x86_64).

jmc


Eclipse 4.34
The Mission Control client is now built to run optimally on Eclipse 2024-12 and later. To install JDK Mission Control into Eclipse, go to the update site (Help | Install New Software…). The URL to the update site will be vendor specific, and some vendors will instead provide an archive with the update site.

eclipse


Support for Jolokia JMX Connection and Discovery
JMC now supports connecting to JVMs using Jolokia, and also supports Jolokia’s auto discovery mechanism.

jolokia


Minor bugfixes and improvements
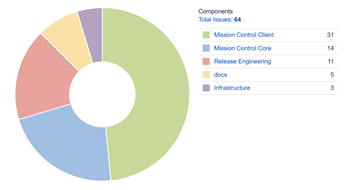
There are 64 fixes and improvements in this release. Check out the JMC 9.1 Result Dashboard (https://bugs.openjdk.org/secure/Dashboard.jspa?selectPageId=23411) for more information.

issues


Core


API to easily write annotated Java JFR events
The JFR Writer API has been extended with the ability to use the custom JFR event types (i.e. classes extending jdk.jfr.Event) and register new writer type for them and also directly accept the instances of those types to write them in the recording.

jfreventsupport


Allow primitive types in converters
Previously a converter could not be used to convert from a primitive type like long. This capability can for example be useful to convert a timestamp (type long) into a human readable string.

agentconverters


Rule for detecting Java process with PID 1
PID 1 is treated specially in Linux, and is assumed to be used by the init process. The init process has some additional responsibilities, such as assuming the responsibility for orphaned processes. The init process is assumed to never quit, and e.g. any signal handler registered for SIGSEV will not be run. This can be problematic, even when running in containerized environments. The rule will detect if this is the case, and propose a path to fixing it (e.g. using tini).

rule


The halt rule result has been improved
The halt rule will now show a table of the top 5 thread halting VM operations.

rule


Better descriptions for the code cache rule
The descriptions for the code cache rule have been improved, highlighting what the effects of a full code cache can be and what actions to take to increase the size of the code cache.

rule


Add support for the new allocation profiler in rules
The following rules have been updated to be able to use the new ObjectAllocationSample events: AllocationByClassRule, AllocationByThreadRule, AutoBoxingRule.

rule


Java Flight Recorder (JFR)


JMC displaying long value in scientific notation
The TLSHandshakeEvent.java records “Certificate Id” as a long value, and JMC was showing it in scientific notation. This was also true for process identifiers. This has now been fixed.

noimage[1]


Showing RSS
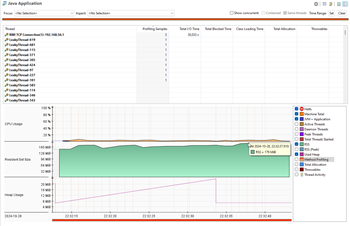
JMC will now show the the resident set size (RSS), both on the memory page as well as the java application page. The RSS can for example be helpful when trying to determine if there is a native memory leak or heavy native memory fragmentation occurring. The RSS graphs can be toggled on and off using the check box legends to the right of the graphs.

rss


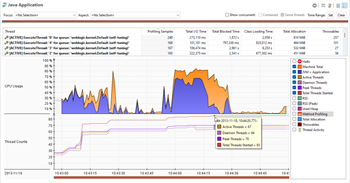
Showing thread counts
JMC will now show thread counts on the java application page. This can for example be useful when trying to determine if there is a thread leak. The thread count graphs can be toggled on and off using the check box legends to the right of the graphs.

threadcounts


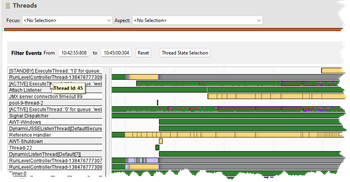
Thread id on hover
In the threads page, hovering over a thread name will show the threadid in the tooltip.

threadid


Bug Fixes


Area: Platform
Issue: 8306
Synopsis: Missing plug-ins while installing JMC in an Eclipse IDE

Mission Control would fail to install because some third party libraries were not included in the update site. This has now been fixed.

Area: Core
Issue: 8295
Synopsis: Shutdown event type id was not properly translated for Oracle JDK 8

The shutdown event type id for legacy Oracle JDK 8, leading to the shutdown time and shutdown reason not being properly displayed on the JVM Internals page.

Area: Core
Issue: 8287
Synopsis: Fix the JMX protocol extenders

The JMC protocol extension mechanism was broken in JMC 9.0.0 when some code was migrated from application to core. This has now been fixed.

Area: Core
Issue: 8303
Synopsis: NPE when running jfr rules reports

The rules report could throw NPEs when an accessor for an attribute could not be found. That has been fixed, and the faulty query responsible for the reported problem has been fixed as well.

Area: JFR
Issue: 8248
Synopsis: Low contrast for the stacktrace view when running in windows high contrast mode

With high contrast mode enabled in Windows 7 and above the contrast on the Stacktrace View was quite low, with the values being barely visible. This has now been fixed.


Known Issues


Area: JFR
Issue: 7071
Synopsis: JMC can’t attach to jlinked JVMs

This one is still under investigation, but it seems JMC can’t attach to certain jlinked images.

Area: JFR
Issue: 7003
Synopsis: The graph view, heatmap view and dependency view does not work on Windows

This is due to a problem with the Windows based browser component in SWT. We’re hoping for a fix in the component for a future version of the Eclipse platform.
Contributing to OpenJDK Mission Control

Hacktoberfest Banner

Since this month is Hacktoberfest, I thought it would be a good idea to talk a bit about how to contribute to the OpenJDK Mission Control project. Some of the content of this blog post will be applicable to any of the OpenJDK projects, especially the Skara (OpenJDK on Git) bits.

The OpenJDK Mission Control Project

The OpenJDK Mission Control project is the observability tools suite for OpenJDK. It contains a JMX Console, a JFR visualizer and analyzer, a heap waste analysis tool, and many other little useful tools and utilities. Since it is all open source, pretty much anyone can contribute to the project.

The project is on GitHub:
https://github.com/openjdk/jmc

The first step to contribute to JDK Mission Control is to simply fork the repository on GitHub. This establishes a copy of the repository where you can freely make changes as you please. Whilst it is technically possible to make the changes in the master branch, it will save time and effort if you later want to contribute the effort to make the changes in a branch:
git checkout -b my-jmc-test

Building JMC

First of all, ensure that you have jdk11 active in your shell, and verify that this is the case using:
java -version

There are multiple ways to build JMC. The easiest way is to simply use the build script (don’t do this just yet):
./build.sh –packageJmc

There is also a way to build JMC using Docker (don’t do this just yet either):
docker-compose -f docker/docker-compose.yml run jmc

These are however not the best ways when you’re developing JMC using an IDE. The third party dependencies for JMC need to be available through a p2 repository, and you want to install a build of the JMC core libraries into your maven cache.

So, to set things properly up for development, it is better to first install the core libraries:

cd $JMC_ROOT/core
mvn install

Next, build the p2 site and start jetty to expose it on a well known port:

cd $JMC_ROOT/releng/third-party
mvn p2:site
mvn jetty:run

Then leave jetty running for as long as you are developing JMC. You will need it up and running so that it can be found both when building from the command line, as well as when compiling JMC from within the Eclipse development environment.

To build the JMC application, next do the following in a separate shell (since you have jetty with the p2 site for the third-party dependencies up and running in the previous one):

cd $JMC_ROOT
mvn package

After this, you can use the build script to run the built JMC product:
./build.sh –run

For alternative ways of launching JMC, see the platform specific documentation in the README.md.

Developing JMC

Many that I’ve talked to, especially when JMC was shipped with the Oracle JDK, believed that JMC is a native application. If you’ve browsed the repo, you’ve already seen that it is a Java application, more specifically an Eclipse RCP application. Since it is an Eclipse RCP application, it’s easiest to develop JMC using Eclipse.

First set up your development environment, following the Developer Guide. It is slightly involved, but luckily does not need to happen very often.

Next, in your branch in your fork, commit the changes you want to contribute, and create a pull request, just like you would for any other open source project on GitHub.

Now, if this is your first OpenJDK PR, the OpenJDK bot will likely complain about a few different things, for example:

  • You need to have your GitHub account associated with a company that has a signed Oracle Contributor Agreement (OCA), or you must have signed an OCA yourself.
  • The PR needs to have an associated issue in the Java Bug System.
  • There is some problem with the testing or formatting of your code.

Let’s take a quick look at these three problems.

The Oracle Contributor Agreement

Like all open source projects, there needs to be a Contributor Agreement in place. This is to protect everyone backing the project, as well as the customers depending on the project. For example, the contributor agreement ensures that the source code you’re contributing isn’t violating any patent rights, and that the source code you’re contributing is yours to contribute.

Many larger companies already have an OCA signed, so the first step might be to check with your company if one is already signed. In my case, I both have a personal OCA signed (since I was contributing before Datadog signed an OCA), and one signed by my employer, Datadog.

You will know that the OCA status is not properly set up for your GitHub account when the OCA label is set in the PR, and the following text can be found in the PR:
⚠️ OCA signatory status must be verified

The OpenJDK bot will write helpful messages in the PR to help guide you through getting your OCA status verified.

The Java Bug System

Once you have a few commits under your belt, and become an OpenJDK author, you have access to the Java Bug System (JBS): https://bugs.openjdk.java.net/. So, what do you do before then? If the PR passes a first cursory check by the reviewers, a reviewer will simply create an Issue in JBS for you.

Fixing Issues

If you end up having an issue, the details of the test run in the PR will hopefully be enough to sort it out. If not, you can run mvn verify locally and look at the test logs. If it is formatting, then check if the formatting problem was in core or not, and either run mvn spotless:apply in core or in the root of the project.

Skara – the OpenJDK Git Tooling

Skara is the project name for the tooling around developing OpenJDK on Git(Hub). It actually insulates a lot of the GitHub specifics, making it possible, should the need ever arise, to move the development and development process somewhere else. The project also contains the aforementioned bot that helps, for example, to verify that there is a related JBS issue, and that there is a signed OCA. Skara also contains some useful git extensions which make working with OpenJDK on GitHub smoother.

To set things up, do the following:

Clone Skara:
git clone https://github.com/openjdk/skara

Build it:
gradlew (win) or sh gradlew (mac/linux)

Install it:
git config –global include.path “%CD%/skara.gitconfig” (win), or
git config –global include.path “$PWD/skara.gitconfig” (mac/linux)

Set where to sync your forks from:
git config –global sync.from upstream

Here are some examples:

To sync your fork with upstream and pull the changes:
git sync –pull

Note: if the sync fails with the error message “No remote provided to fetch from, please set the –from flag” or “error: upstream is not a known git remote, nor a proper git URI”, remember to set the remote for your repo, e.g.

git remote add upstream https://github.com/openjdk/jmc

To list the open PRs:
git pr list

To create a PR:
git pr create

To push your committed changes in your branch to your fork, creating the remote branch:
git publish

So, the normal workflow when working with OpenJDK JMC using the Skara tooling becomes:

Note: First ensure that you have a fork of JMC, and that your current directory is the root of that fork. You typically just create that one fork and stick with it.

  1. (Optional) Sync up your fork with upstream:
    git sync –pull
  2. Create a branch to work on, with a name you pick, typically related to the work you plan on doing:
    git checkout –b <branchname>
  3. Make your changes / fix your bug / add amazing stuff
  4. (Optional) Run jcheck locally:
    git jcheck local
  5. Push your changes to the new branch on your fork:
    git publish (which is pretty much git push –set-upstream origin <branchname>)
  6. Create the PR, either on GitHub, or from the command line:
    git pr create

Once the PR is created, the bot will check that everything is okay, and the PR will be reviewed.

Interacting with the Skara Bot

Getting the PR merged is handled a bit differently in OpenJDK compared to normal GitHub projects. First of all, all the prerequisites must first be fulfilled, like the OCA status of the contributor being verified, the change being properly reviewed, jcheck passing, the tests passing, the PR having a matching issue in JBS etc. Once that is all taken care of, the bot will helpfully ask, in a message in the PR, for the author of the PR to integrate the changes. This is simply done by typing /integrate in message in the PR. The bot will automatically rebase on the latest changes in the target branch (normally master) and squash your commits. In other words, it is perfectly fine to have multiple fixes and other commits happening in the PR after the initial commit for the PR. It is actually much preferred to force-updating the PR, as it’s easier to follow along with the review.

If the PR author is not a committer on the project, the bot will inform that the PR is ready to be sponsored by a committer, which is normally done by the reviewer of the PR. This is done by writing /sponsor in a separate message in the PR.

When the PR is merged, the corresponding JBS issue is automatically closed.

Other Related Repos

There are a few additional repos that are related to the OpenJDK JMC project, but that aren’t currently OpenJDK projects. Two examples are the jmc-jshell and the jmc-tutorial repositories. The jmc-tutorial is a good resource for learning about JDK Mission Control. Even though it is not officially an OpenJDK repository, it can still be a good place to start contributing to the OpenJDK JMC community.

Summary

  • Contributing to OpenJDK is easier than ever before now that it’s on GitHub.
  • Skara makes it even easier.
  • It’s Hacktoberfest – commits to the JMC project (and related repos) count!
  • JBS is a good source for JMC starter bugs.
  • If you need any help, the JDK Mission Control slack is a good place for asking questions! Ping me or any of the JMC folks for an invite. 🙂
  • Finally, here’s a practical guide to OpenJDK projects and the roles:
    OpenJDK Projects (java.net)

Update Your Third Party Dependencies!

Now that Eclipse Photon has been released, there are a few things you need to do to keep your JMC builds happy.

  1. Get the latest changes:
    hg pull
    hg update

  2. Rebuild the third-party dependencies (new terminal):
    cd releng/third-party
    mvn p2:site
    mvn jetty:run

  3. Build it all (in the jmc root folder):
    mvn clean package

If you have imported JMC into Eclipse, you also need to change the target platform. Simply remove the old target platform (Preferences | Plug-in Development / Target Platform):

image

Then press “Apply and Close”.

Next open the releng/platform-definitions/platform-definition-photon/platform-definition-photon.target file (File | Open File…). In the upper right corner, press Set as Active Target Platform.

image

JMC should now rebuild!

Done!

Developing OpenJDK Mission Control

The last blog (about Fetching and Building OpenJDK Mission Control) earned me questions on how to get the source into Eclipse to start playing around with it. This blog post will assume that you have first successfully completed the steps in the Fetching and Building OpenJDK Mission Control blog post.

Getting Eclipse

First of all you should download the latest version of Eclipse. JMC is an RCP application, and thus, the easiest way to make changes to it, is to use the Eclipse IDE.

There are various Eclipse bundles out there. Get (at least) the Eclipse IDE for Eclipse Committers. It adds some useful things, like PDE (the Plugin Development Environment), Git, the Marketplace client and more. You can also use the Eclipse IDE for Java Enterprise Developers.

You will need an Eclipse 2018-12 or later!

To get to the screen where you can select another packaging than the standard, click on the Download Packages link on the Eclipse download page.


Install it, start it and create a new workspace for your JMC work. Creating a new workspace is as easy as picking a new name when starting up your Eclipse in the dialog asking for a directory for the workspace:
image

Installing JDKs

Since you’ve already built JMC outside of the IDE, you already have a JDK 8. You probably also want to have a JDK 11 set up in your Eclipse.

Download and install a JDK11, then open Window | Preferences and then select Java / Installed JREs. Add your favourite JKD 8 and JDK 11 JDKs (Add…) and then use Java / Installed JREs / Execution Environments to set them as defaults for the JDK 8 and JDK 11 execution environments.

Note to JMC lovers:

You may want to ensure that a JDK is used to run your Eclipse, and not a jre. A JDK is needed for JMC to find the tools.jar, where the classes required for JMC to discover locally running JVMs are located. Simply add the –vm flag in your eclipse.ini file, and point it to your JDK:

image


Setting installed JREs:

image

Setting execution environments:

image

Okay, we now have our JDKs set up. Next step is to set up a user library for things that JMC will need from the JDK. This is directly from the JMC readme:

If importing the application projects, make sure you create a user library (Preferences | Java/Build Path/User Libraries) named JMC_JDK, and add (Add External JARs…) the following JARs from a JDK 8 (u40 or above) to the User Library: tools.jar (/lib/tools.jar), jconsole.jar (/lib/jconsole.jar), jfxswt.jar (/jre/lib/jfxswt.jar), and finally the jfxrt.jar (/jre/lib/ext/jfxrt.jar).

Creating the user library:

image

Adding the jars:

image

Now we need to check a few things…

Checkpoint

Is the Jetty server from the previous blog up and running?
image

If yes, go ahead and open up the target file available under releng/platform-definitions/platform-definition-photon (File | Open File). You should see something like this:

image

Click the Set as Active Target Platform link in the upper right corner.

Now there is one final preparation for the import – we need to turn of certain Maven settings. Go to the preferences, and select Maven / Errors/Warnings. Set Plugin execution not covered by lifecycle configuration to Ignore, and also Out-of-date project configuration to Ignore

image

Now the preparations are done, and we can start importing the projects. Woho!

Importing the Projects

First we will have to import the core projects, since they are built separately from the rest. Select File | Import… and select Maven / Existing Maven Project.
image

Click next, and browse into the jmc/core folder. Select all the core projects and import them. (You may want to skip the top level poms.)

Next select File | Import… and select Maven / Existing Maven Project again, but this time from the root:

Again, you may want to skip the top level poms (/pom.xml, application/pom.xml etc), and the uitests (at least until we fix so that the jemmy dependency can be downloaded from Maven Central).
image

Next we will import the project which contains the launchers. Select File | Import… and then select Existing Projects into Workspace. Find the configuration/ide/eclipse folder and click Ok.

image

After importing that project, we can now launch JMC from within Eclipse:

image

Or run it in debug mode:

image

Configuring Development Settings

If you don’t plan on submitting any changes, then this step is optional. The team use shared settings for formatter and macros. Go to the preferences and then to Java / Code Style / Formatter. Then click Import… and select the configuration/ide/eclipse/formatting/formatting.xml. You should now have the Mission Control formatting settings active:

image

Optional:

If you have the spotbugs plug-in installed, you should also import the spotbugs excludes (configuration/spotbugs/spotbugs-exclude.xml). There is also a common dictionary (configuration/ide/eclipse/dictionary/dictionary.txt) and templates (configuration/ide/eclipse/templates/JMC templates.xml) which you may find useful.

Adding (and Launching with) Some Custom Plug-in

The flame graph view may be included in JMC at some point. If so, then there will probably be some other plug-in somewhere that will serve as an example.

First install Git. If you, on the command line, can run git –version, you’re all set.

Next go to your git folder (or wherever you keep your git projects) and clone the jmc-flame-view repo:

git clone https://github.com/thegreystone/jmc-flame-view

Next go to Eclipse and do File | Import…, and select Existing Projects into Workspace. Select your jmc-flame-view folder, and click Finish:

image

Next we need a launcher which includes this new feature. Go to the org.openjdk.jmc.eclipseonfig project and open the launchers folder. Copy and paste the JMC RCP plug-ins.launch file. Name the copy something.

image

Click the run dropdown and select Run Configurations….

image

Select your new launcher, and click the Plug-ins tab. Add the new Flame Graph feature:

image

Click Apply and Run. Mission Control will start, with your new plug-in available. In the started JMC, go to Window | Show View | Other…. Select Mission Control / Flame Graph in the Show View dialog. Open a Flight Recording, and click on something that would yield an aggregated stack trace, such as something in the Method Profiling page, or a class in the Memory page – you should now see a Flame Graph of your selection.

Summary

This blog post explained, in some detail, how to import the OpenJDK Mission Control project into Eclipse, and how to set up the workspace to work on the code. It also explained how to run the code with an additional plug-in from a separate repo.

As always, please let me know if I forgot to mention something (except for the agent, which I will deal with in a separate post)!