Contributing to OpenJDK Mission Control

Hacktoberfest Banner

Since this month is Hacktoberfest, I thought it would be a good idea to talk a bit about how to contribute to the OpenJDK Mission Control project. Some of the content of this blog post will be applicable to any of the OpenJDK projects, especially the Skara (OpenJDK on Git) bits.

The OpenJDK Mission Control Project

The OpenJDK Mission Control project is the observability tools suite for OpenJDK. It contains a JMX Console, a JFR visualizer and analyzer, a heap waste analysis tool, and many other little useful tools and utilities. Since it is all open source, pretty much anyone can contribute to the project.

The project is on GitHub:
https://github.com/openjdk/jmc

The first step to contribute to JDK Mission Control is to simply fork the repository on GitHub. This establishes a copy of the repository where you can freely make changes as you please. Whilst it is technically possible to make the changes in the master branch, it will save time and effort if you later want to contribute the effort to make the changes in a branch:
git checkout -b my-jmc-test

Building JMC

First of all, ensure that you have jdk11 active in your shell, and verify that this is the case using:
java -version

There are multiple ways to build JMC. The easiest way is to simply use the build script (don’t do this just yet):
./build.sh –packageJmc

There is also a way to build JMC using Docker (don’t do this just yet either):
docker-compose -f docker/docker-compose.yml run jmc

These are however not the best ways when you’re developing JMC using an IDE. The third party dependencies for JMC need to be available through a p2 repository, and you want to install a build of the JMC core libraries into your maven cache.

So, to set things properly up for development, it is better to first install the core libraries:

cd $JMC_ROOT/core
mvn install

Next, build the p2 site and start jetty to expose it on a well known port:

cd $JMC_ROOT/releng/third-party
mvn p2:site
mvn jetty:run

Then leave jetty running for as long as you are developing JMC. You will need it up and running so that it can be found both when building from the command line, as well as when compiling JMC from within the Eclipse development environment.

To build the JMC application, next do the following in a separate shell (since you have jetty with the p2 site for the third-party dependencies up and running in the previous one):

cd $JMC_ROOT
mvn package

After this, you can use the build script to run the built JMC product:
./build.sh –run

For alternative ways of launching JMC, see the platform specific documentation in the README.md.

Developing JMC

Many that I’ve talked to, especially when JMC was shipped with the Oracle JDK, believed that JMC is a native application. If you’ve browsed the repo, you’ve already seen that it is a Java application, more specifically an Eclipse RCP application. Since it is an Eclipse RCP application, it’s easiest to develop JMC using Eclipse.

First set up your development environment, following the Developer Guide. It is slightly involved, but luckily does not need to happen very often.

Next, in your branch in your fork, commit the changes you want to contribute, and create a pull request, just like you would for any other open source project on GitHub.

Now, if this is your first OpenJDK PR, the OpenJDK bot will likely complain about a few different things, for example:

  • You need to have your GitHub account associated with a company that has a signed Oracle Contributor Agreement (OCA), or you must have signed an OCA yourself.
  • The PR needs to have an associated issue in the Java Bug System.
  • There is some problem with the testing or formatting of your code.

Let’s take a quick look at these three problems.

The Oracle Contributor Agreement

Like all open source projects, there needs to be a Contributor Agreement in place. This is to protect everyone backing the project, as well as the customers depending on the project. For example, the contributor agreement ensures that the source code you’re contributing isn’t violating any patent rights, and that the source code you’re contributing is yours to contribute.

Many larger companies already have an OCA signed, so the first step might be to check with your company if one is already signed. In my case, I both have a personal OCA signed (since I was contributing before Datadog signed an OCA), and one signed by my employer, Datadog.

You will know that the OCA status is not properly set up for your GitHub account when the OCA label is set in the PR, and the following text can be found in the PR:
⚠️ OCA signatory status must be verified

The OpenJDK bot will write helpful messages in the PR to help guide you through getting your OCA status verified.

The Java Bug System

Once you have a few commits under your belt, and become an OpenJDK author, you have access to the Java Bug System (JBS): https://bugs.openjdk.java.net/. So, what do you do before then? If the PR passes a first cursory check by the reviewers, a reviewer will simply create an Issue in JBS for you.

Fixing Issues

If you end up having an issue, the details of the test run in the PR will hopefully be enough to sort it out. If not, you can run mvn verify locally and look at the test logs. If it is formatting, then check if the formatting problem was in core or not, and either run mvn spotless:apply in core or in the root of the project.

Skara – the OpenJDK Git Tooling

Skara is the project name for the tooling around developing OpenJDK on Git(Hub). It actually insulates a lot of the GitHub specifics, making it possible, should the need ever arise, to move the development and development process somewhere else. The project also contains the aforementioned bot that helps, for example, to verify that there is a related JBS issue, and that there is a signed OCA. Skara also contains some useful git extensions which make working with OpenJDK on GitHub smoother.

To set things up, do the following:

Clone Skara:
git clone https://github.com/openjdk/skara

Build it:
gradlew (win) or sh gradlew (mac/linux)

Install it:
git config –global include.path “%CD%/skara.gitconfig” (win), or
git config –global include.path “$PWD/skara.gitconfig” (mac/linux)

Set where to sync your forks from:
git config –global sync.from upstream

Here are some examples:

To sync your fork with upstream and pull the changes:
git sync –pull

Note: if the sync fails with the error message “No remote provided to fetch from, please set the –from flag”, remember to set the remote for your repo, e.g.

git remote add upstream https://github.com/openjdk/jmc

To list the open PRs:
git pr list

To create a PR:
git pr create

To push your committed changes in your branch to your fork, creating the remote branch:
git publish

So, the normal workflow when working with OpenJDK JMC using the Skara tooling becomes:

Note: First ensure that you have a fork of JMC, and that your current directory is the root of that fork. You typically just create that one fork and stick with it.

  1. (Optional) Sync up your fork with upstream:
    git sync –pull
  2. Create a branch to work on, with a name you pick, typically related to the work you plan on doing:
    git checkout –b <branchname>
  3. Make your changes / fix your bug / add amazing stuff
  4. (Optional) Run jcheck locally:
    git jcheck local
  5. Push your changes to the new branch on your fork:
    git publish (which is pretty much git push –set-upstream origin <branchname>)
  6. Create the PR, either on GitHub, or from the command line:
    git pr create

Once the PR is created, the bot will check that everything is okay, and the PR will be reviewed.

Interacting with the Skara Bot

Getting the PR merged is handled a bit differently in OpenJDK compared to normal GitHub projects. First of all, all the prerequisites must first be fulfilled, like the OCA status of the contributor being verified, the change being properly reviewed, jcheck passing, the tests passing, the PR having a matching issue in JBS etc. Once that is all taken care of, the bot will helpfully ask, in a message in the PR, for the author of the PR to integrate the changes. This is simply done by typing /integrate in message in the PR. The bot will automatically rebase on the latest changes in the target branch (normally master) and squash your commits. In other words, it is perfectly fine to have multiple fixes and other commits happening in the PR after the initial commit for the PR. It is actually much preferred to force-updating the PR, as it’s easier to follow along with the review.

If the PR author is not a committer on the project, the bot will inform that the PR is ready to be sponsored by a committer, which is normally done by the reviewer of the PR. This is done by writing /sponsor in a separate message in the PR.

When the PR is merged, the corresponding JBS issue is automatically closed.

Other Related Repos

There are a few additional repos that are related to the OpenJDK JMC project, but that aren’t currently OpenJDK projects. Two examples are the jmc-jshell and the jmc-tutorial repositories. The jmc-tutorial is a good resource for learning about JDK Mission Control. Even though it is not officially an OpenJDK repository, it can still be a good place to start contributing to the OpenJDK JMC community.

Summary

  • Contributing to OpenJDK is easier than ever before now that it’s on GitHub.
  • Skara makes it even easier.
  • It’s Hacktoberfest – commits to the JMC project (and related repos) count!
  • JBS is a good source for JMC starter bugs.
  • If you need any help, the JDK Mission Control slack is a good place for asking questions! Ping me or any of the JMC folks for an invite. 🙂
  • Finally, here’s a practical guide to OpenJDK projects and the roles:
    OpenJDK Projects (java.net)

Fetching and Building Mission Control 8+

As described in a previous post, Mission Control is now on GitHub. Since this alters how to fetch and build OpenJDK Mission Control, this is an updated version of my old post on how to fetch and build JMC from version 8 and up.

Getting Git

First step is to get Git, the SCM used for OpenJDK Mission Control. Installing Git is different for different platforms, but here is a link to how to get started:

https://git-scm.com/book/en/v2/Getting-Started-Installing-Git

Installing the Skara Tooling (Optional)

This is an optional step, making it easier if you want to contribute to Mission Control:

http://hirt.se/blog/?p=1186

Cloning the Source

Once Git is installed properly, getting the source is as easy as cloning the jmc repo. First change into the directory where you want to check out jmc. Then run:

git clone https://github.com/openjdk/jmc.git

Getting Maven

Since you probably have some Java experience, you probably already have Maven installed on your system. If you do not, you now need to install it. Simply follow the instructions here:

https://maven.apache.org/install.html

Building Mission Control

First we need to ensure that Java 8 is on our path. Some of the build components still use JDK 8, so this is important.

java –version

This will show the Java version in use. If this is not a Java 8 JDK, change your path. Once done, we are now ready to build Mission Control. Open up two terminals. Yep, two!

In the first one, go to where your cloned JMC resides and type in and execute the following commands (for Windows, replace the dash (/) with a backslash (\)):

cd releng/third-party
mvn p2:site
mvn jetty:run

Now, leave that terminal open with the jetty running. Do not touch.

In the second terminal, go to your cloned jmc directory. First we will need to build and install the core libraries:

cd core
mvn install

Next run maven in the jmc root:

mvn clean package

JMC should now be building. The first time you build Maven will download all of the third party dependencies. This will take some time. Subsequent builds will be less painful. On my system, the first build took 6:01 min. The subsequent clean package build took 2:38.

Running Mission Control

To start your recently built Mission Control, run:

Windows

target\products\org.openjdk.jmc\win32\win32\x86_64\jmc.exe -vm %JAVA_HOME%\bin

Mac OS X

target/products/org.openjdk.jmc/macosx/cocoa/x86_64/JDK\ Mission\ Control.app/Contents/MacOS/jmc -vm $JAVA_HOME/bin

Contributing to JDK Mission Control

To contribute to JDK Mission Control, you need to have signed an Oracle Contributor Agreement. More information can be found here:

http://openjdk.java.net/contribute/

Don’t forget to join the dev list:

http://mail.openjdk.java.net/mailman/listinfo/jmc-dev

We also have a Slack (for contributors), which you can join here:

https://join.slack.com/t/jdkmissioncontrol/signup

More Info

For more information on how to run tests, use APIs etc, there is a README.md file in the root of the repo. Let me know in the comments section if there is something you think I should add to this blog post and/or the README!

Using the Skara Tooling

I’m writing this for myself as much as I’m writing this to share. After only a day of using JMC with Skara, I’ve fallen in love with it. I spend less time painstakingly putting together review e-mails, copying and pasting code to comment on certain lines of code, cloning separate repos to do parallel work efficiently, setting up new workspaces for the these repos etc. Props to the Skara team for saving me time by cutting out a big chunk of the stuff not related to coding and a whole lot of ceremony.

Note that the Skara tooling can be used outside of the scope of OpenJDK – git sync alone is a good reason for why everyone who wants to reduce ceremony can benefit from the Skara tooling.

So, here are a few tips on how to get started:

  1. Clone Skara:
    git clone https://github.com/openjdk/skara
  2. Build it:
    gradlew (win) or sh gradlew (mac/linux)
  3. Install it:
    git config --global include.path "%CD%/skara.gitconfig" (win) or git config --global include.path "$PWD/skara.gitconfig" (mac/linux)
  4. Set where to sync your forks from:
    git config --global sync.from upstream

For folks on Red Hat distros, 2 and 3 can be replaced by make install. For more information on the installation, see the Skara wiki.

Some Examples

To sync your fork with upstream and pull the changes:
git sync --pull

Note: if the sync fails with the error message “No remote provided to fetch from, please set the –from flag”, remember to set the remote for your repo, e.g.
git remote add upstream https://github.com/openjdk/jmc

To list the open PRs:
git pr list

To create a PR:
git pr create

To push your committed changes in your branch to your fork, creating the remote branch:
git publish

JMC Workflow

Below is the typical work-flow for JMC.

First ensure that you have a fork of JMC. Either fork it on github.com, or on the command line:
git fork https://github.com/openjdk/jmc jmc

You typically just create that one fork and stick with it.

  1. (Optional) Sync up your fork with upstream:
    git sync --pull
  2. Create a branch to work on, with a name you pick, typically related to the work you plan on doing:
    git checkout –b <branchname>
  3. Make your changes / fix your bug / add amazing stuff
  4. (Optional) Run jcheck locally:
    git jcheck local
  5. Push your changes to the new branch on your fork:
    git publish (which is pretty much git push --set-upstream origin <branchname>)
  6. Create the PR, either on GitHub, or from the command line:
    git pr create

Summary / TL;DR

  • I ❤️ Skara

Mission Control is Now Officially on GitHub!

Since this morning, the JDK Mission Control (JMC) project has gone full Skara! mc_512x512This means that the next version (JMC 8.0) will be developed over at GitHub.

To contribute to JDK Mission Control, you (or the company you work for) need to have signed an OCA, like for any other OpenJDK-project. If you already have an OpenJDK username, you can associate your GitHub account with it.

Just after we open sourced JMC, I created a temporary mirror on GitHub to experiment with working with JMC at GitHub. That mirror is now closed for business. Please use the official OpenJDK one from now on:

https://github.com/openjdk/jmc

If you forked or stared the old repo, please feel free to fork and/or star the new one!

JFR is Coming to OpenJDK 8!

I recently realized that this isn’t common knowledge, so I thought I’d take the opportunity to talk about the JDK Flight Recorder coming to OpenJDK 8! The backport is a collaboration between Red Hat, Alibaba, Azul and Datadog. These are exciting times for production time profiling nerds like me. Smile

The repository for the backport is available here:

http://hg.openjdk.java.net/jdk8u/jdk8u-jfr-incubator/

The proposed CSR is available here:

https://bugs.openjdk.java.net/browse/JDK-8230764

The backport is keeping the same interfaces and pretty much the same implementation as is available in OpenJDK 11, and is fully compatible. There were a few security fixes, due to there not being any module system to rely upon for isolation of the internals, also, some events will not be available (e.g. the Module related events) but other than that the API and tools work exactly the same.

JDK Mission Control will, of course, be updated to work flawlessly with the OpenJDK 8 version of JFR as well. The changes will be minute and are only necessary since Mission Control has some built-in assumptions that no longer hold true.

You can already build and try out OpenJDK 8 with JFR simply by building the JDK available in the repository mentioned above. Also, Aleksey Shipilev provide binaries – see here for details.

Have fun! Smile

Flight Recorder & Mission Control at Code One 2019

Code One is rapidly approaching (September 16-19). For fans of JDK Flight Recorder and JDK Mission Control, there will be a lot of relevant activities at Code One. This is an attempt to list them. If I missed something, please let me know!

Sessions

Here are the regular sessions:

Session Name

Presenters Day Time

Location

JDK Mission Control: Where We Are, Where We Are Going [DEV4284]

David Buck Monday 9:00 Moscone South
Room 301

Introduction to JDK Mission Control and JDK Flight Recorder [DEV2316]

Marcus Hirt
Klara Ward
Monday 16:00 Moscone South
Room 202
Improving Observability in Your Application with JFR and JMC [DEV3460] Marcus Hirt
Mario Torre
Tuesday 11:30 Moscone South
Room 201
Java Flight Recorder: Black Box of Java Applications[DEV3957] Poonam Parhar Wednesday 12:30

Moscone South
Room 203

Robotics on JDK 11? With Modules? Are You… [DEV2329] Marcus Hirt
Miro Wengner
Robert Savage
Wednesday 16:00

Moscone South
Room 313

Four Productive Ways to Use Open Source JFR and JMC Revisited [DEV3118] Sven Reimers
Martin Klähn
Thursday 11:15 Moscone South
Room 304
Enhanced Java Flight Recorder at Alibaba [DEV3667] Sanhong Li
Fangxi Yin
Guangyu Zhu
Thursday 12:15 Moscone South
Room 203

Performance Monitoring with Java Flight Recorder on OpenJDK [DEV2406]

Hirofumi Iwasaki
Hiroaki Nakada
Thursday 13:15 Moscone South
Room 201

Again, if I’ve missed one, please let me know!

Other Activities

  • There is going to be a hackergarten session around JMC and JFR, Wednesday at 14:30-16:00, inside of the Groundbreakers booth in the Exhibition Area.
  • On Friday a few JMC project members are planning to meet up for some coding between 10:00 and 12:00, and then have lunch together at 12:00. Ping me (Marcus) for an invite.
  • On Wednesday at 18:00 a few JMC project members are planning to go for dinner. Ping me (Marcus) for an invite.

Summary

  • Lots to do at Code One 2019 for fans of JFR and JMC.
  • Helpful links above. Winking smile

Using Dynamic Working Sets in Eclipse

JDK Mission Control is quite modular. To help navigate the source, working sets come in quite handy. And for a more flexible way to define working sets, Oomph provide a very nice plug-in for constructing dynamic working sets, using rules and regular expressions.

To use, first install the Oomph Dynamic Working Sets plug-in into your Eclipse:
https://wiki.eclipse.org/Dynamic_Working_Sets#Download.2FInstallation

Next either start creating your own working sets, or start out with the ones I use:
https://github.com/thegreystone/jmc-dev-helpers

To edit/create the working sets, go to Preferences | Oomph / Dynamic Working Sets, and press Edit…

Once satisfied with the working sets, you can switch the Package Explorer to using the Working Sets as Top Level Elements:

workingset

Good luck!

Deep Distributed Tracing with OpenTracing and the JDK Flight Recorder

Recently I had a talk at Code One about using OpenTracing together with the JDK Flight Recorder to do deep tracing. Since the session wasn’t recorded, I though I’d do a blog about it instead. Here we go…

Distributed tracing has been of interest for a very long time. Multiple companies have sprung up around the idea over the years, and most APM (Application Performance Management) solutions are built around the idea. Google released a paper around their large scale distributed systems tracing infrastructure in 2010 – Dapper, and there are now several open source alternatives for distributed tracing available inspired by the paper, such as Jaeger and Zipkin.

In Java land, pretty much all of the APMs are doing pretty much the same thing: they use BCI (byte code instrumentation) for getting the data, and then they present that data to the end-user in various ways, oftentimes using some kind of analysis to recognize common problems and suggesting solutions to the end users of the APM. The real differentiation is knowing what data to get, and what to do with the data once captured.

Since there was no standard, one problem was for vendors to inject helpful, vendor specific, information into the distributed traces. The vendor of a software component may have a quite good idea about what information would be helpful to solve problems. Some vendors support APM specific APIs for contributing the data, but more often than not the instrumentation is done using BCI by scores of developers working for the various APM companies. The same is true for maintainers of open source components – either skip the problem entirely and let the APM vendors come up with good instrumentations points (if your component is popular enough), or pick a popular APM and integrate with it. That is, until OpenTracing came along…

Introduction to OpenTracing

OpenTracing is an open source, vendor neutral, distributed tracing API. In other words, library developers can interact with one API to support multiple APM/Tracer vendors. Also, customers can add contextual information to distributed traces without worrying about vendor lock-in. Contributors to OpenTracing include LightStep, Jaeger, Skywalking and Datadog, and the specification is available on GitHub:

https://github.com/opentracing

The core API concepts in OpenTracing are (from the slides of my talk, DEV5435):


Trace


– A distributed operation, potentially spanning multiple processes


– Implicitly defined by the individual Spans in the trace (more soon)


– Can be thought of as a directed acyclic graph (DAG) of Spans


– The span in the root of the DAG is called the root Span


– The edges between the Spans are called References


Span


– Has an operation name


– Has a start timestamp


– Has a finish timestamp


– Has a SpanContext


• Has Baggage Items (key/value pairs which cross process boundaries)


• Implementation specific state used to identify the span across process boundaries)


– Zero or more key/value Span Tags


– Zero or more Span Logs (key/value + timestamp)


Reference


– Defines a direct casual relationship between two spans


– ChildOf


• Parent depends on the child in some way


• Note that it is legal for a finish timestamp of a child to be after that of any parent


– FollowFrom


• Parent does not depend on the result of the child in any way


• Note that it is legal for a FollowsFrom child to be started after the end of any ancestor

Also worth noting is that a Scope is a thread local activation of a span.

The Example

As an example, we’ll be using a simple application consisting of three microservices. It is part of the back-end of a fictional robot store. Robots can be ordered at the Orders service, and they will be produced in a Factory. There is also a Customers service keeping track of the customers. Finally there is a load generator that can be used to exercise the services.

image 

The code is available under https://github.com/thegreystone/problematic-microservices. (Yes, as the name indicates, the services come pre-packaged with built-in problems. :))

The services, as well as the load generator, have built-in tracing support, so for a full systems run with the load generator, you would get a trace (a DAG of spans), looking something along the lines of:

image

Or, in Jaeger, where you have time on the X axis:

tracing

In this case I have scrolled down a bit to focus on the factory. As can be seen, there is great variability in the time it takes to create a chassis and/or paint a robot. We have multiple production lanes, and we’d expect times across the factory lanes to be more even, not to mention much faster. So what gives?

Well, we can expand the operation to see if there was some additional information:

tracing_details

Now, sometimes the tags may include crucial pieces information that may help you solve the problem without needing any additional information. In this particular case, though, knowing that we were building a pink BB-8 isn’t really doing the trick.

What would be the next step? All too often the next step would be to look at the code around the instrumentation point, trying to figure out what was going on at the time simply from analyzing the code. Sometimes that may be quite hard. The problem may be in third party code not expected to behave badly. There may even be some other piece of code not directly in the code path causing the problems, perhaps an agent misbehaving and causing long lasting safe points in the JVM.

So, we’re screwed then? Nah. What if you had a magic tool that could record what was going on in the JVM and the application at the time of the incident? Something providing not only method profiling information, but a deeper view, including information about vm operations, memory allocation profiling, events for the usual application caused thread halts and much, much more. Something that could be always on, with very low overhead. And let’s say you ran with a tracer that added some contextual information, such as information that could be used to identify traces, spans and thread local span activations in the recorded data, and which allowed you to use your favourite tracer too? Then things would get interesting indeed…

Running with the JFR Tracer

For Code One I wrote a little delegating JFR tracer, which allows you to record contextual information into the flight recorder. It was meant as an example on how to do deep distributed tracing. Deep enough to solve entire classes of problems that are hard to solve without more detailed knowledge.

The tracer works with Oracle JDK 7+ and OpenJDK 11+ (it is a multi-release jar, a.k.a. mrjar), and the source is available on GitHub here:

https://github.com/thegreystone/jfr-tracer

The bundle is available from Maven Central, and here is the dependency you need to add:

<dependency>
<groupId>se.hirt.jmc</groupId>
<artifactId>jfr-tracer</artifactId>
<version>0.0.3</version>
</dependency>

Next you need to initiate your tracer and pass it to the constructor of the DelegatingJfrTracer, like so:

GlobalTracer.register(new DelegatingJfrTracer(yourFavTracer));

That’s it. When the tracer is running you will get contextual information recorded into the flight recorder.

Looking at the Recording

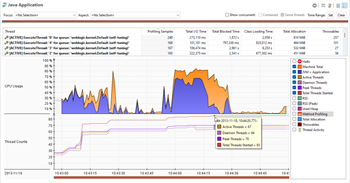
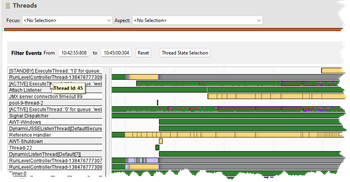
Dumping the flight recorder for the factory, and looking at the dump in the Threads view, might look something like this:

image

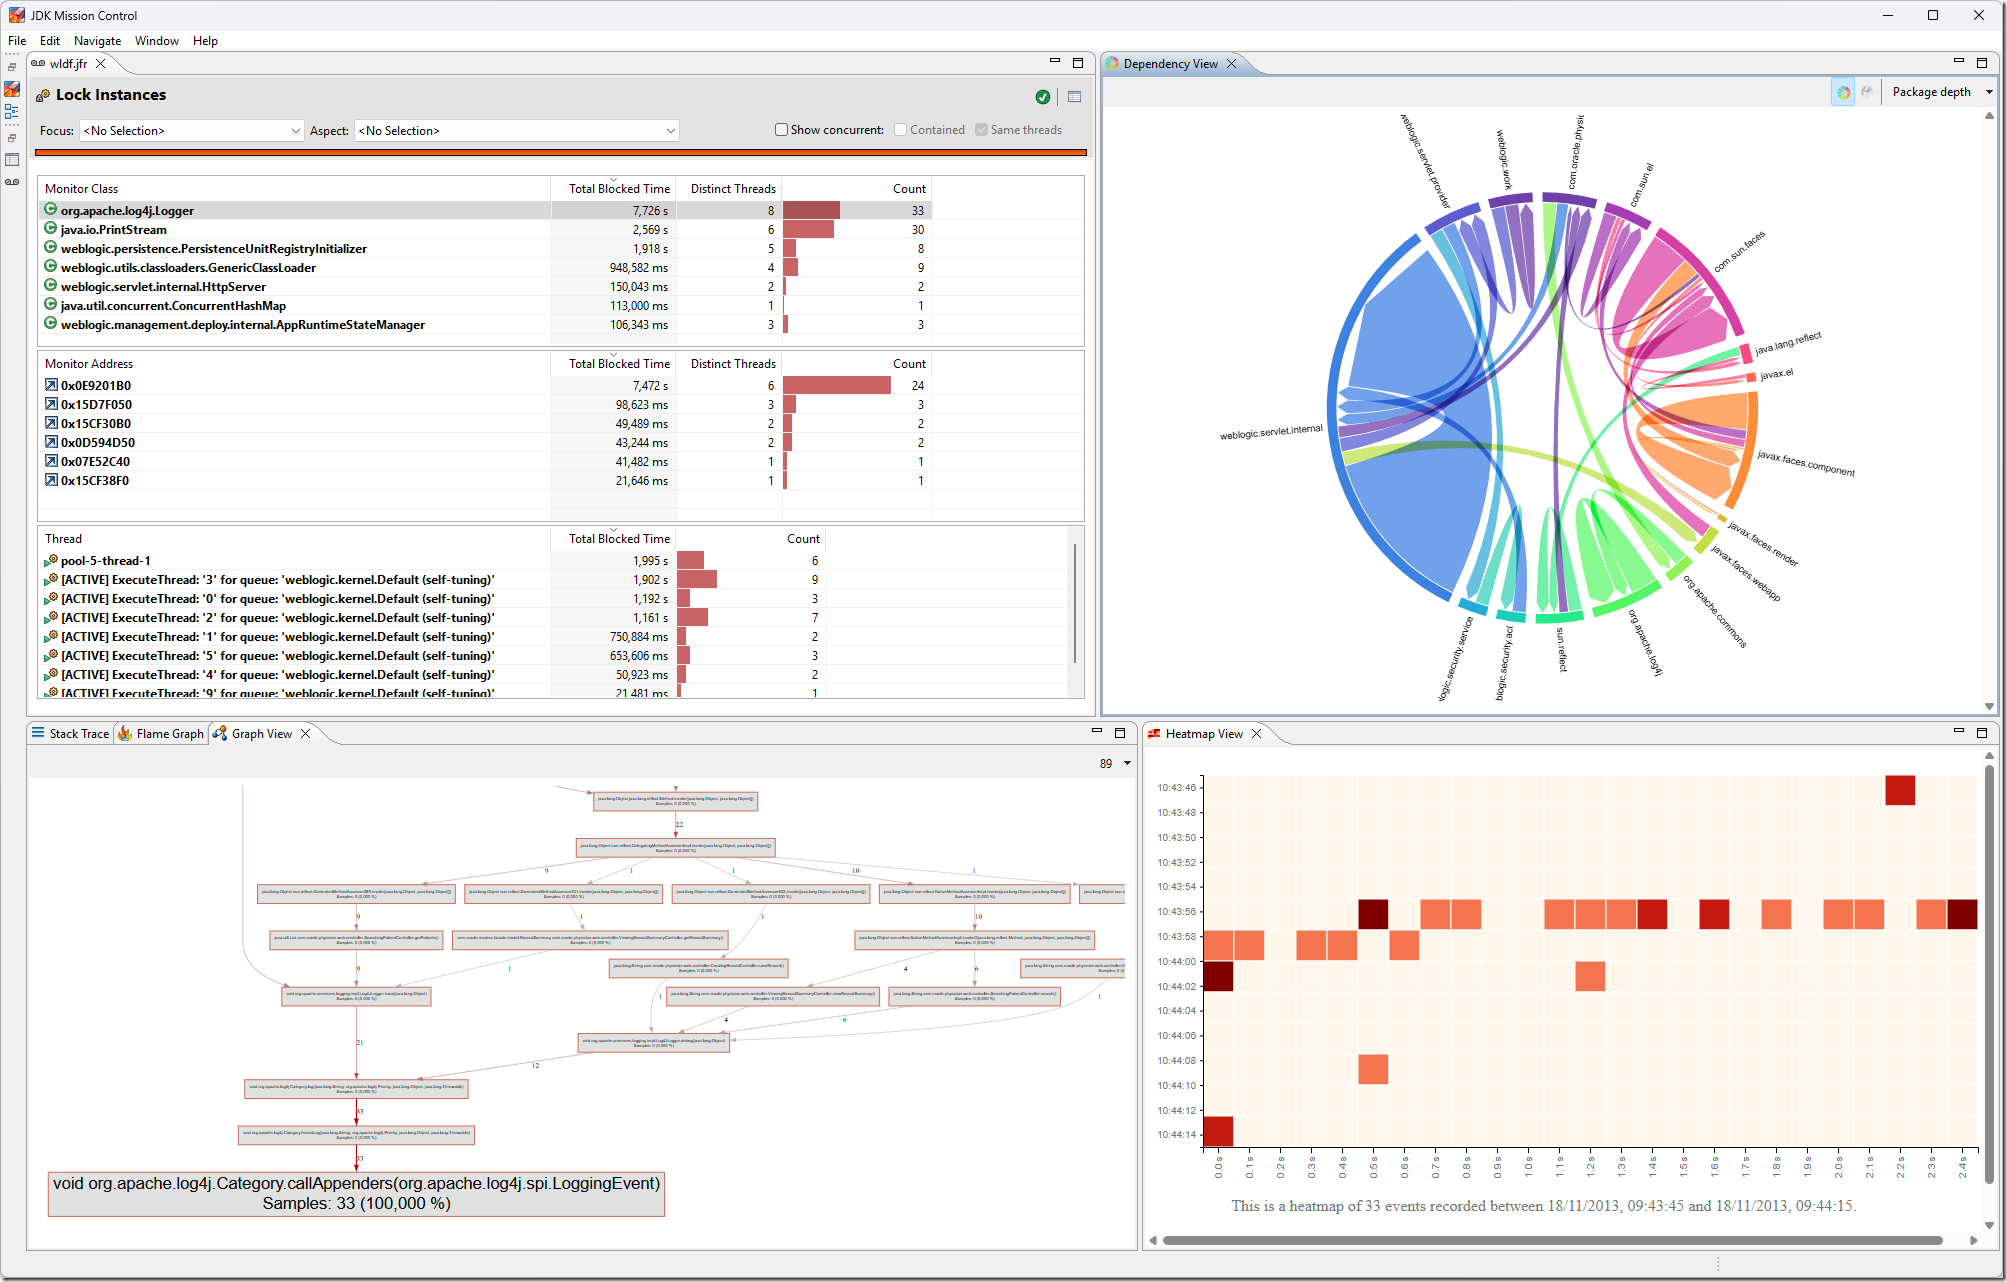
We can see that we have these long lasting monitor enter (Java Blocking) events, and looking at the stack traces directly by selecting individual events, or at the Lock Instances page, it is fairly obvious where the contention is:

image

We can, of course, create a custom OpenTracing view to make it easier to directly finding and homing in on long lasting traces (I’ll create a repo for a ready made one with some more flair at some point). Simply go the the Event Browser, and right click on the Open Tracing folder. Select “Create a new page using the selected event types”. You will now have a new page in the Outline. You can right click on the title on the page to rename it and switch icon.

Next select an arbitrary event, and right click on it. Select Group-By->Trace Id. In the new Group By table that appeared, select Visible Columns to enable (at least) the attribute showing the longest duration (the total duration of (wall clock) time the trace spent in the process that the recording came from). Next sort on the Longest Duration column.

In this case I’ve ran a few more (press enter in the single step load generator a few times, or let it just continuously add load):

image

You can, of course add additional tables with groupings that can be useful, for example, per thread. To quickly home in the entire user interface on a trace id of interest, just select a trace and choose “Store and Set as Focused Selection”:

SNAGHTML38aee12

Now you can go back to, for example, the Threads view, and click the Time Range: Set button in the upper right corner. Voila, you are in exactly the right place. You may also want to view concurrently occurring events in the same threads (see check boxes on top), and enable additional thread lanes:

SNAGHTML38f17fd

Summary

  • Distributed tracing is great, especially in today’s world of (very µ and plenty) µ-services.
  • For the Java platform, injecting trace/span-identifying information as contextual information into the JDK Flight Recorder is dynamite.
  • A simple example on how to do this automagically is available on my GitHub as a delegating Tracer, in an mrjar, supporting Oracle JDK 7+ and OpenJDK 11+:
        https://github.com/thegreystone/jfr-tracer
  • The slides for my Code One presentations can be found here:
        https://oracle.rainfocus.com/widget/oracle/oow18/catalogcodeone18?search=hirt
    (The relevant session for this blog is DEV5435.)
  • The JDK Flight Recorder r0xx0rz.
  • JDK Mission Control r0xx0rz.

Note that since the article was written, I have donated the tracer to OpenTracing.
See https://github.com/opentracing-contrib/java-jfr-tracer.

JMC Open Sourced!

This is going to be a short blog post, because it is past bedtime and I’m frankly pretty beat. Just wanted to say thank you to everyone who helped open source Java Mission Control in the relatively short period of time it was done in.

So a huge thank you to everyone on the Stockholm JMC team: Klara Ward, Ola Westin, Henrik Dafgård, Erik Greijus and Per Kroon. And to Dalibor Topic, who had the thankless job to go through all the source and built artifacts checking on, among other things, licenses and copyrights. Also thank you to Donald Smith for handling the internal license approval process, and Mark Reinhold for advice. Also, a big thank you to Guru, who is prepping to start building Oracle binary builds of the OpenJDK project. And to Iris who published the repos and set up the project on OpenJDK. And to everyone who I’ve forgotten to mention, since my brain is no longer really functioning at 2 a.m. You guys rock!

The repositories are available here:

      http://hg.openjdk.java.net/jmc

  • The jmc repo contains the source, which is buildable using Maven.
    Everything you need to know about building JMC is in the README.txt
    Please read it first, thoroughly, before asking questions.
  • The jmc-graphics repo contains artwork and graphic files, like splash screens and icons.

We also have a slack at https://jdkmissioncontrol.slack.com/.

If you have any questions, don’t hesitate to ask!

Kind regards,
Marcus

JMC & JFR in JDK 9 Labs

So JavaOne 2017 has now come and gone. This year it was a pretty great one! The Java keynote was IMHO the best one in years, with plenty of great announcements and interesting content. The sessions I managed to attend were also very high quality. Not to mention the dinners and the parties. Winking smile

One of the sessions I did this year was a hands-on-lab on Java Mission Control 6 and Java Flight Recorder in JDK 9.

IMG_6670

Since it was full, and since people who could not attend have asked for it, I promised to put the HoL on my blog. Well, here it is!

There are three files:

  1. The lab instructions.
  2. The full lab content for Windows x64 (easiest, but largest download, 856MiB).
  3. The project files only (all other platforms, 39MiB).

Hope this helps!

Please let me know if you find any errors in the labs, or if you get stuck!

/M