Sneak Peek of JDK Mission Control 7 Tutorial

Even though JMC 7 is not GA yet, I thought I’d make the upcoming JMC Tutorial available on my GitHub. Hopefully this will be a good resource to help to learn more about using Mission Control 7 and Flight Recorder in OpenJDK 11.

It does takes a bit of preparation to run it for now:

  • JDK Mission Control will need to be built from source, since there are no update sites available yet
  • JOverflow will not work until JMC-6121 is solved
  • Exercise 5 will be better once JMC-6127 is solved

That said, all the preparations needed are listed in the README.md file in the GitHub repo:

https://github.com/thegreystone/jmc-tutorial

Please let me know if something is missing from the instructions!

Dudes and Dudettes, Things Just Got Better!

Oh my god. The amount of FUD concerning the JDK licensing for JDK 11 is just amazing.

So, unless I’ve missed something, Oracle does the following:

  1. Contributes pretty much all of the closed source technologies (or what was originally to become closed source) of the Oracle JDK to OpenJDK, for example giving the community:
    • JDK Flight Recorder
    • JDK Mission Control
    • ZGC
    • …and probably more stuff I can’t think of right now
  2. Ensures the Oracle JDK and the OpenJDK builds are virtually indistinguishable, except for licensing
  3. Moves to, from what I’ve been told, a very competitively priced subscription model (as opposed to the rather, IMHO, highly priced Java SE Advanced licenses)
  4. Starts providing a free OpenJDK build (which includes all these donated technologies)
  5. Provides uncountable man hours of maintaining and innovating the Java platform
  6. Ensures that the community knows where to find the free bits by linking to them, and slaps on a bright yellow warning sign, so that everyone can see that the licensing has changed:

    image

And how does the community react, you wonder? Yep, that’s right. “Oracle is the Devil”, “This is a bait and switch operation” etc. Ad nauseum.

So, this is my personal take on open source: if I like a certain open source technology, and it helps me in my work, I support it. Either by contributing, or by paying (gasp) money for it. Especially if I would like the technology to thrive in the future. Technologies that are not supported, tend to die and be forgotten. I have personally, for a very long time, paid a yearly contribution of 35$ to Eclipse. And that is even though my team, and countless of other teams at Oracle, have contributed to various Eclipse projects over the years. And, no, Eclipse does not provide me support for it.

Summary

Oracle gives away countless of highly regarded technologies and starts releasing free OpenJDK builds. Parts of the Java community throws a fit.

My Sessions at Code One 2018

If anyone would like to catch up with me at Code One, here are some specific times where my location is known in advance. 😉

Session Title

ID

Date Start Time End Time

Room

Contributing to the Mission Control
OpenJDK Project

[DEV4506]

Monday,
Oct 22

10:30

11:15

Moscone West
Room 2004
Robotics on Java Simplified

[DEV6089]

Monday,
Oct 22

14:30

15:15

Moscone West
Room 2024

Production-Time Profiling
and Diagnostics on the JVM

[DEV4507]

Wednesday,
Oct 24

10:30

11:15

Moscone West
Room 2004
OpenJDK Mission Control:
The Hands-on-Lab

[HOL4508]

Wednesday,
Oct 24

12:30

14:30

Moscone West
Room 2001A

Diagnose Your Microservices:
OpenTracing/Oracle Application
Performance Monitoring Cloud

[DEV5435]

Wednesday,
Oct 24

16:00

16:45

Moscone West
Room 2011

Getting Started with the
(Open Source) JDK Mission Control

[DEV4509]

Thursday,
Oct 25

11:00

11:45

Moscone West
Room 2014

Note that the last few years, the HoL has been full – it may be a good idea to register for it early. Especially now that JMC/JFR is being open sourced (JDK 11, JMC 7).

Looking forward to seeing you at Code One!

Here is a link to the sessions in the content catalogue.

JMC 7 Early Access Builds Available (and New Packaging)

Early access builds of JDK Mission Control are now available. They can be fetched from here:

http://jdk.java.net/jmc/

With JMC 7, we are switching to a new delivery model, with a separate installer for JMC. There are multiple reasons for this, such as having one deliverable which supports both OpenJDK and the Oracle JDK, and wasting less disk space for those of us having multiple JDKs installed.

I wrote a blog together with Aurelio with more information here:

https://blogs.oracle.com/java-platform-group/java-mission-control-now-serving-openjdk-binaries-too

We’re still working on providing a good way to provide feedback. Within a few weeks, you should be able to provide feedback through webbugs. Until then, the best way is to talk to us at the OFTC #jmc channel.

Looking forward to seeing you there!

Update Your Third Party Dependencies!

Now that Eclipse Photon has been released, there are a few things you need to do to keep your JMC builds happy.

  1. Get the latest changes:
    hg pull
    hg update

  2. Rebuild the third-party dependencies (new terminal):
    cd releng/third-party
    mvn p2:site
    mvn jetty:run

  3. Build it all (in the jmc root folder):
    mvn clean package

If you have imported JMC into Eclipse, you also need to change the target platform. Simply remove the old target platform (Preferences | Plug-in Development / Target Platform):

image

Then press “Apply and Close”.

Next open the releng/platform-definitions/platform-definition-photon/platform-definition-photon.target file (File | Open File…). In the upper right corner, press Set as Active Target Platform.

image

JMC should now rebuild!

Done!

Developing OpenJDK Mission Control

The last blog (about Fetching and Building OpenJDK Mission Control) earned me questions on how to get the source into Eclipse to start playing around with it. This blog post will assume that you have first successfully completed the steps in the Fetching and Building OpenJDK Mission Control blog post.

Getting Eclipse

First of all you should download the latest version of Eclipse. JMC is an RCP application, and thus, the easiest way to make changes to it, is to use the Eclipse IDE.

There are various Eclipse bundles out there. Get (at least) the Eclipse IDE for Eclipse Committers. It adds some useful things, like PDE (the Plugin Development Environment), Git, the Marketplace client and more. You can also use the Eclipse IDE for Java Enterprise Developers.

You will need an Eclipse 2018-12 or later!

To get to the screen where you can select another packaging than the standard, click on the Download Packages link on the Eclipse download page.


Install it, start it and create a new workspace for your JMC work. Creating a new workspace is as easy as picking a new name when starting up your Eclipse in the dialog asking for a directory for the workspace:
image

Installing JDKs

Since you’ve already built JMC outside of the IDE, you already have a JDK 8. You probably also want to have a JDK 11 set up in your Eclipse.

Download and install a JDK11, then open Window | Preferences and then select Java / Installed JREs. Add your favourite JKD 8 and JDK 11 JDKs (Add…) and then use Java / Installed JREs / Execution Environments to set them as defaults for the JDK 8 and JDK 11 execution environments.

Note to JMC lovers:

You may want to ensure that a JDK is used to run your Eclipse, and not a jre. A JDK is needed for JMC to find the tools.jar, where the classes required for JMC to discover locally running JVMs are located. Simply add the –vm flag in your eclipse.ini file, and point it to your JDK:

image


Setting installed JREs:

image

Setting execution environments:

image

Okay, we now have our JDKs set up. Next step is to set up a user library for things that JMC will need from the JDK. This is directly from the JMC readme:

If importing the application projects, make sure you create a user library (Preferences | Java/Build Path/User Libraries) named JMC_JDK, and add (Add External JARs…) the following JARs from a JDK 8 (u40 or above) to the User Library: tools.jar (/lib/tools.jar), jconsole.jar (/lib/jconsole.jar), jfxswt.jar (/jre/lib/jfxswt.jar), and finally the jfxrt.jar (/jre/lib/ext/jfxrt.jar).

Creating the user library:

image

Adding the jars:

image

Now we need to check a few things…

Checkpoint

Is the Jetty server from the previous blog up and running?
image

If yes, go ahead and open up the target file available under releng/platform-definitions/platform-definition-photon (File | Open File). You should see something like this:

image

Click the Set as Active Target Platform link in the upper right corner.

Now there is one final preparation for the import – we need to turn of certain Maven settings. Go to the preferences, and select Maven / Errors/Warnings. Set Plugin execution not covered by lifecycle configuration to Ignore, and also Out-of-date project configuration to Ignore

image

Now the preparations are done, and we can start importing the projects. Woho!

Importing the Projects

First we will have to import the core projects, since they are built separately from the rest. Select File | Import… and select Maven / Existing Maven Project.
image

Click next, and browse into the jmc/core folder. Select all the core projects and import them. (You may want to skip the top level poms.)

Next select File | Import… and select Maven / Existing Maven Project again, but this time from the root:

Again, you may want to skip the top level poms (/pom.xml, application/pom.xml etc), and the uitests (at least until we fix so that the jemmy dependency can be downloaded from Maven Central).
image

Next we will import the project which contains the launchers. Select File | Import… and then select Existing Projects into Workspace. Find the configuration/ide/eclipse folder and click Ok.

image

After importing that project, we can now launch JMC from within Eclipse:

image

Or run it in debug mode:

image

Configuring Development Settings

If you don’t plan on submitting any changes, then this step is optional. The team use shared settings for formatter and macros. Go to the preferences and then to Java / Code Style / Formatter. Then click Import… and select the configuration/ide/eclipse/formatting/formatting.xml. You should now have the Mission Control formatting settings active:

image

Optional:

If you have the spotbugs plug-in installed, you should also import the spotbugs excludes (configuration/spotbugs/spotbugs-exclude.xml). There is also a common dictionary (configuration/ide/eclipse/dictionary/dictionary.txt) and templates (configuration/ide/eclipse/templates/JMC templates.xml) which you may find useful.

Adding (and Launching with) Some Custom Plug-in

The flame graph view may be included in JMC at some point. If so, then there will probably be some other plug-in somewhere that will serve as an example.

First install Git. If you, on the command line, can run git –version, you’re all set.

Next go to your git folder (or wherever you keep your git projects) and clone the jmc-flame-view repo:

git clone https://github.com/thegreystone/jmc-flame-view

Next go to Eclipse and do File | Import…, and select Existing Projects into Workspace. Select your jmc-flame-view folder, and click Finish:

image

Next we need a launcher which includes this new feature. Go to the org.openjdk.jmc.eclipseonfig project and open the launchers folder. Copy and paste the JMC RCP plug-ins.launch file. Name the copy something.

image

Click the run dropdown and select Run Configurations….

image

Select your new launcher, and click the Plug-ins tab. Add the new Flame Graph feature:

image

Click Apply and Run. Mission Control will start, with your new plug-in available. In the started JMC, go to Window | Show View | Other…. Select Mission Control / Flame Graph in the Show View dialog. Open a Flight Recording, and click on something that would yield an aggregated stack trace, such as something in the Method Profiling page, or a class in the Memory page – you should now see a Flame Graph of your selection.

Summary

This blog post explained, in some detail, how to import the OpenJDK Mission Control project into Eclipse, and how to set up the workspace to work on the code. It also explained how to run the code with an additional plug-in from a separate repo.

As always, please let me know if I forgot to mention something (except for the agent, which I will deal with in a separate post)!

Fetching and Building OpenJDK Mission Control

(Please note that an updated version of this article, for JMC 8+, is available here: https://hirt.se/blog/?p=1196.)

Since people keep asking me, I thought I’d put together this quick primer on how to get started with OpenJDK Mission Control. Now, once the early access builds of JMC 7 is out, that will probably be the easiest way to get started for people who don’t want to change stuff. This blog, however, will be for the ones of you who would like to build JMC from source.

Getting Mercurial

First step is to get Mercurial, the SCM used for OpenJDK. JMC (being an OpenJDK project) is available through a Mercurial repository. Installing Mercurial is different for different platforms:

Mac OS X

Easiest is to install through Homebrew:

brew install mercurial

That said, dmg packages can also be downloaded from here: https://www.mercurial-scm.org/wiki/Download.

Windows

Go to https://www.mercurial-scm.org/wiki/Download. Download the InnoSetup based installer and run it. Ensure that the “add to path” checkbox is checked. Verify that the install went fine by opening a command prompt and typing hg and enter. A list of the available commands should be printed.

Linux

For Debian based distributions, you can install using the package manager:

sudo apt-get install mercurial

That said, you can also get rpms and other installation packages from here: https://www.mercurial-scm.org/wiki/Download.

Cloning the Source

Once Mercurial is installed properly, getting the source is as easy as cloning the jmc repo. First change into the directory where you want to check out jmc. Then run:

hg clone http://hg.openjdk.java.net/jmc/jmc/

Getting Maven

Since you probably have some Java experience, you probably already have Maven installed on your system. If you do not, you now need to install it. Simply follow the instructions here:

https://maven.apache.org/install.html

Building Mission Control

First we need to ensure that Java 8 is on our path. Some of the build components still use JDK 8, so this is important.

java –version

This will show the Java version in use. If this is not a Java 8 JDK, change your path. Once done, we are now ready to build Mission Control. Open up two terminals. Yep, two!

In the first one, go to where your cloned JMC resides and type in and execute the following commands (for Windows, replace the dash (/) with a backslash (\)):

cd releng/third-party
mvn p2:site
mvn jetty:run

Now, leave that terminal open with the jetty running. Do not touch.

In the second terminal, go to your cloned jmc directory. First we will need to build and install the core libraries:

cd core
mvn install

Next run maven in the jmc root:

mvn clean package

JMC should now be building. The first time you build Maven will download all of the third party dependencies. This will take some time. Subsequent builds will be less painful. On my system, the first build took 6:01 min. The subsequent clean package build took 2:38.

Running Mission Control

To start your recently built Mission Control, run:

Windows

target\products\org.openjdk.jmc\win32\win32\x86_64\jmc.exe -vm %JAVA_HOME%\bin

Mac OS X

target/products/org.openjdk.jmc/macosx/cocoa/x86_64/JDK\ Mission\ Control.app/Contents/MacOS/jmc -vm $JAVA_HOME/bin

Contributing to JDK Mission Control

To contribute to JDK Mission Control, you need to have signed an Oracle Contributor Agreement. More information can be found here:

http://openjdk.java.net/contribute/

Don’t forget to join the dev list:

http://mail.openjdk.java.net/mailman/listinfo/jmc-dev

If there is interest, I will add a more detailed blog post on this later.

More Info

For more information on how to run tests, use APIs etc, there is a README.md file in the root of the mercurial repo. Let me know in the comments section if there is something you think I should add to this blog post and/or the README!

JMC Open Sourced!

This is going to be a short blog post, because it is past bedtime and I’m frankly pretty beat. Just wanted to say thank you to everyone who helped open source Java Mission Control in the relatively short period of time it was done in.

So a huge thank you to everyone on the Stockholm JMC team: Klara Ward, Ola Westin, Henrik Dafgård, Erik Greijus and Per Kroon. And to Dalibor Topic, who had the thankless job to go through all the source and built artifacts checking on, among other things, licenses and copyrights. Also thank you to Donald Smith for handling the internal license approval process, and Mark Reinhold for advice. Also, a big thank you to Guru, who is prepping to start building Oracle binary builds of the OpenJDK project. And to Iris who published the repos and set up the project on OpenJDK. And to everyone who I’ve forgotten to mention, since my brain is no longer really functioning at 2 a.m. You guys rock!

The repositories are available here:

      http://hg.openjdk.java.net/jmc

  • The jmc repo contains the source, which is buildable using Maven.
    Everything you need to know about building JMC is in the README.txt
    Please read it first, thoroughly, before asking questions.
  • The jmc-graphics repo contains artwork and graphic files, like splash screens and icons.

We also have a slack at https://jdkmissioncontrol.slack.com/.

If you have any questions, don’t hesitate to ask!

Kind regards,
Marcus

JMC & JFR in JDK 9 Labs

So JavaOne 2017 has now come and gone. This year it was a pretty great one! The Java keynote was IMHO the best one in years, with plenty of great announcements and interesting content. The sessions I managed to attend were also very high quality. Not to mention the dinners and the parties. Winking smile

One of the sessions I did this year was a hands-on-lab on Java Mission Control 6 and Java Flight Recorder in JDK 9.

IMG_6670

Since it was full, and since people who could not attend have asked for it, I promised to put the HoL on my blog. Well, here it is!

There are three files:

  1. The lab instructions.
  2. The full lab content for Windows x64 (easiest, but largest download, 856MiB).
  3. The project files only (all other platforms, 39MiB).

Hope this helps!

Please let me know if you find any errors in the labs, or if you get stuck!

/M

JMC 6 Automated Analysis Headless

This post will be a little bit wider than the title implies; it will be about using the JMC core JFR APIs in general. That said, one of the things we will be using it for, towards the end, will be to run the JMC 6 automated analysis headless.

This article will also cheat by talking about JMC 6.1, so that anyone reading this article will have relevant information for JMC 6.1 as well. Winking smile 

The JAR-files Needed

To run these examples you will need to have the following Jar-files from the JDK_HOME/lib/missioncontrol/plugins folder on your classpath:

Prefix

Version needed

Comment

com.oracle.jmc.common

>= 6.0.0

Classes common to JMC, such as stacktrace definitions, the content type system (quantities/ units of measurement) etc.
com.oracle.jmc.flightrecorder

>= 6.0.0

The Java Flight Recorder parser, classes for extracting information from a recording.
com.oracle.jmc.flightrecorder.rules

>= 6.0.0

The core definitions and classes for automated analysis of recordings.
com.oracle.jmc.flightrecorder.rules.jdk

>= 6.0.0

Contains the rules for the JDK (such as rules for synchronization trouble, long lasting VM operations and much more).
com.oracle.jmc.flightrecorder.ext.wls.parser

>= 6.0.0

(Optional, only relevant for users wanting WebLogic Server extensions)
com.oracle.jmc.flightrecorder.ext.wls.rules

>= 6.0.0

(Optional, only relevant for users wanting WebLogic Server extensions)

Loading a Recording

Loading a recording is done through a call to the JfrLoaderToolkit#loadEvents(). It takes a file argument, and returns an IItemCollection. The IItemCollection can be thought of as a collection of events.

The IItemCollection supports operations like filter(), and getAggregate(). Used correctly, you should rarely need to rely on external iteration.

Here is an example which loads a recording, and calculates the standard deviation for the java monitor enter events in a recording:

import java.io.File;

import com.oracle.jmc.common.IDisplayable;
import com.oracle.jmc.common.item.Aggregators;
import com.oracle.jmc.common.item.IItemCollection;
import com.oracle.jmc.common.item.ItemFilters;
import com.oracle.jmc.common.unit.IQuantity;
import com.oracle.jmc.flightrecorder.JfrAttributes;
import com.oracle.jmc.flightrecorder.JfrLoaderToolkit;
import com.oracle.jmc.flightrecorder.jdk.JdkTypeIDs;

/**
 * Finds out the standard deviation for the java monitor enter events.
 */
public class LoadRecording {
	public static void main(String[] args) throws Exception {
		DemoToolkit.verifyFirstFileArgument(RunRulesOnFile.class, args);
		
		IItemCollection events = JfrLoaderToolkit.loadEvents(new File(args[0]));
		IQuantity aggregate = events.apply(ItemFilters.type(JdkTypeIDs.MONITOR_ENTER))
				.getAggregate(Aggregators.stddev(JfrAttributes.DURATION));
		
		System.out.println("The standard deviation for the Java monitor enter events was "
				+ aggregate.displayUsing(IDisplayable.AUTO));
	}
}

Note the stream-like syntax. The JMC libraries work well together with streams, but are compiled on JDK 7, and can run on a JDK 7 compliant runtime. Also note that some class names start with Jfr whilst others class names start with Jdk. The difference being that some concepts, like DURATION, are intrinsic to JFR, whilst other are defined in terms of the Java JDK classes or runtime, like MONITOR_ENTER.

The JMC core libraries provide common statistical aggregators, and accessors for common attributes. Should you feel something is missing, it is easy to add to the built-in operations.

Also note the IQuantity returned by the aggregator. The built-in system for handling quantities and units of measurement makes it easy to calculate with, and display, quantities in different units of measurement.

Performing an Automated Analysis Headless

It is also easy to run the JMC rules headless using these core libraries. Simply evaluate the rules against the IItemCollection. Here is a simple example iterating through the rules and evaluating them one by one:

import java.io.File;
import java.util.concurrent.RunnableFuture;

import com.oracle.example.jmc6jfr.rules.util.DemoToolkit;
import com.oracle.jmc.common.item.IItemCollection;
import com.oracle.jmc.common.util.IPreferenceValueProvider;
import com.oracle.jmc.flightrecorder.JfrLoaderToolkit;
import com.oracle.jmc.flightrecorder.rules.IRule;
import com.oracle.jmc.flightrecorder.rules.Result;
import com.oracle.jmc.flightrecorder.rules.RuleRegistry;

public class RunRulesOnFileSimple {
	public static void main(String[] args) throws Exception {
		File recording = DemoToolkit.verifyRecordingArgument(RunRulesOnFileSimple.class, args);
		IItemCollection events = JfrLoaderToolkit.loadEvents(recording);
		
		for (IRule rule : RuleRegistry.getRules()) {
			RunnableFuture<Result> future = rule.evaluate(events, IPreferenceValueProvider.DEFAULT_VALUES);
			future.run();
			Result result = future.get();
			if (result.getScore() > 50) {
				System.out.println(String.format("[Score: %3.0f] Rule ID: %s, Rule name: %s, Short description: %s",
						result.getScore(), result.getRule().getId(), result.getRule().getName(),
						result.getShortDescription()));
			}
		}
	}
}

That said, if you are not constrained to have to run on JDK 7, you can always run the rules in parallel, for example by employing parallel streams:

import java.io.File;
import java.util.List;
import java.util.concurrent.ExecutionException;
import java.util.concurrent.Executor;
import java.util.concurrent.Executors;
import java.util.concurrent.RunnableFuture;
import java.util.stream.Collectors;
import java.util.stream.Stream;

import com.oracle.jmc.common.item.IItemCollection;
import com.oracle.jmc.common.util.IPreferenceValueProvider;
import com.oracle.jmc.flightrecorder.JfrLoaderToolkit;
import com.oracle.jmc.flightrecorder.rules.IRule;
import com.oracle.jmc.flightrecorder.rules.Result;
import com.oracle.jmc.flightrecorder.rules.RuleRegistry;

/**
 * Runs the rules on the events in the specified file in parallel, then prints
 * them in order of descending score.
 */
public class RunRulesOnFile {
	private final static Executor EXECUTOR = Executors
			.newFixedThreadPool(Runtime.getRuntime().availableProcessors() - 1);
	private static int limit;

	public static void main(String[] args) throws Exception {
		if (args.length == 0) {
			System.out.println(
					"Usage: RunRulesOnFile <recording file> [<limit>]\n\tThe recording file must be a flight recording from JDK 7 or above. The limit, if set, will only report rules triggered with a score higher or equal than the limit.");
			System.exit(2);
		}
		IItemCollection events = JfrLoaderToolkit.loadEvents(new File(args[0]));
		if (args.length > 1) {
			limit = Integer.parseInt(args[1]);
		}
		Stream<RunnableFuture<Result>> resultFutures = RuleRegistry.getRules().stream()
				.map((IRule r) -> evaluate(r, events));
		List<Result> results = resultFutures.parallel().map((RunnableFuture<Result> runnable) -> get(runnable))
				.collect(Collectors.toList());
		results.sort((Result r1, Result r2) -> Double.compare(r2.getScore(), r1.getScore()));
		results.stream().forEach(RunRulesOnFile::printResult);
	}

	public static RunnableFuture<Result> evaluate(IRule rule, IItemCollection events) {
		RunnableFuture<Result> evaluation = rule.evaluate(events, IPreferenceValueProvider.DEFAULT_VALUES);
		EXECUTOR.execute(evaluation);
		return evaluation;
	}

	public static Result get(RunnableFuture<Result> resultFuture) {
		try {
			return resultFuture.get();
		} catch (InterruptedException | ExecutionException e) {
			e.printStackTrace();
		}
		return null;
	}

	private static void printResult(Result result) {
		if (result.getScore() >= limit) {
			System.out.printf("(%.0f) [%s]: %s\nDetails:\n%s\n============<End of Result>============\n",
					result.getScore(), result.getRule().getId(), result.getShortDescription(),
					result.getLongDescription() == null ? "<no description>" : result.getLongDescription());
		}
	}
}

If you do not need that kind of control, there is a class available for performing automated analysis included with the JMC core library. To run an automatic analysis, simply run the class:

com.oracle.jmc.flightrecorder.rules.report.JfrRulesReport <files> –format <format> –min <severity>

…where files is one or more recordings, and <format> is and <min> is minimum severity to report [ok | info | warning]. In JMC 6.1.0 there is one additional class for generating the file, which produces an HTML in a format and style very similar to the looks of the JMC 6.0.0 Automated Analysis page:

com.oracle.jmc.flightrecorder.rules.report.html.JfrHtmlRulesReport <file> [<outputfile>]

…where <file> is the (single) recording to analyze, and where the optional <outputfile> is where the resulting HTML should be written. If no outputfile is specified, the result of the analysis will be written on stdout.

Adding Custom Rules

It’s easy to add you own heuristics. Do you find yourself with thousands of recordings, and would like to add a Bayesiean network to do some machine learning? The rules are all pure Java, so you can pretty much do whatever you want in a rule.

The easiest way to get started writing your own custom rules is to get yourself an Eclipse Oxygen or later, and install JMC and the experimental PDE plug-in into your Eclipse.

  1. Install Eclipse Oxygen or later.
  2. Got to the Mission Control homepage, and find the Eclipse Update site.
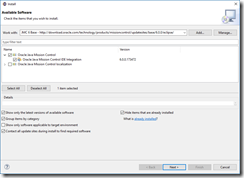
  3. Follow the instructions to install the Mission Control plug-ins.
    image
  4. Got to the Mission Control homepage, and find the Experimental Update site.
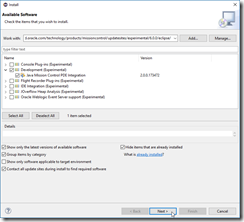
  5. Install the PDE plug-in.
    image

Here is a cheat sheet for the eclipse update sites for the JMC 6.0.0 release:

http://download.oracle.com/technology/products/missioncontrol/updatesites/base/6.0.0/eclipse/

http://download.oracle.com/technology/products/missioncontrol/updatesites/supported/6.0.0/eclipse/

http://download.oracle.com/technology/products/missioncontrol/updatesites/experimental/6.0.0/eclipse/

(JMC 6.1.0 will be released according to the same URL pattern.)

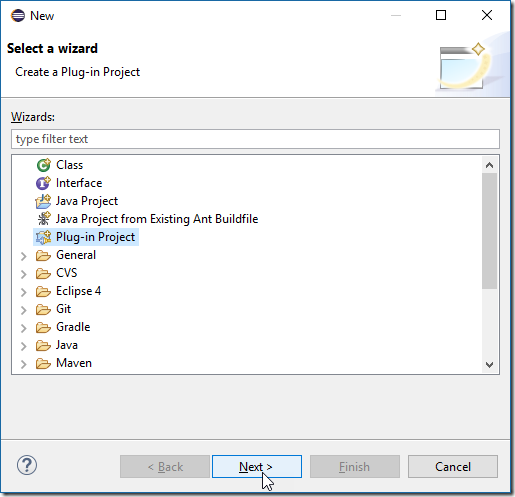
To start building your rule, press ctrl-n (or click the File | New | Other… menu) to bring up the New wizard.
image

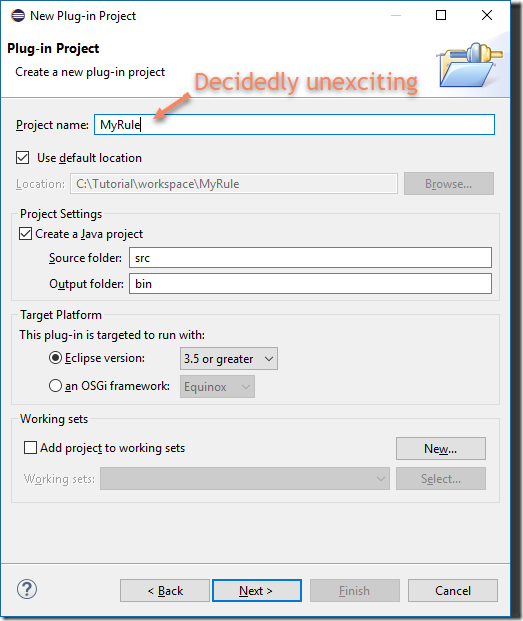
Select Plug-in Project and hit Next. Name your rule project something exciting.
pic

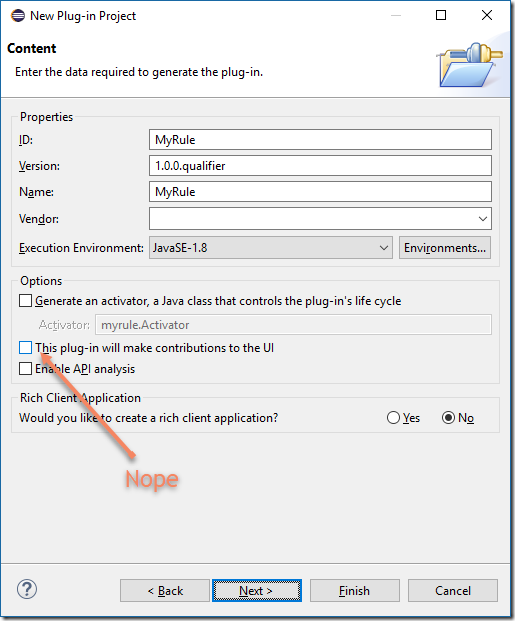
Unclick that this plug-in will make contributions to the UI and hit Next.
pic2

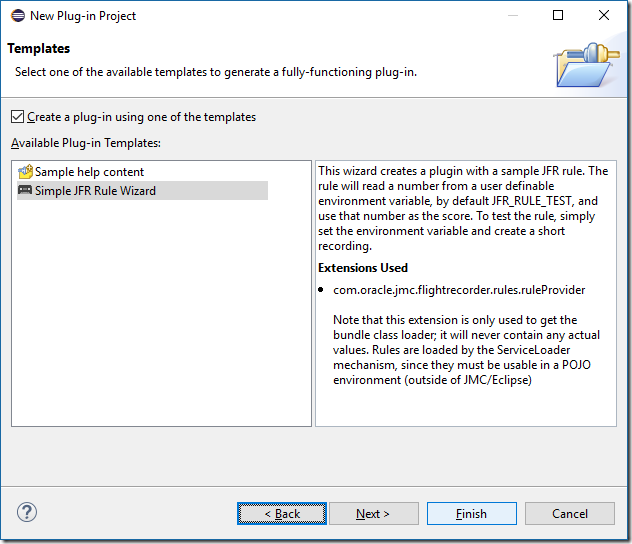
Next select the Simple JFR Rule Wizard and click Finish (or Next, if you really wish to do some further customizations).
pic3

You will now have a new project in your workspace, containing an example rule. If you have compilation errors, you need to set JMC to be your target platform (see the next section). You can either just export your rule, put it on the class path with the other core libraries, or you can try out your rule by running JMC from within Eclipse with your new rule.

Starting JMC from within Eclipse with Workspace Plug-ins

Running JMC from within Eclipse with any plug-ins you are currently developing is a simple matter of setting the plug-in development target platform to your JMC installation, and launching that platform with your workspace plug-ins.

First set JMC to be your target platform.

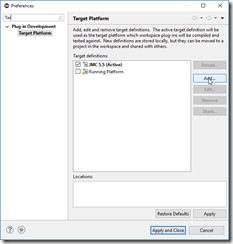
  1. Go to Preferences in the main menu (Window | Preferences on Windows).
  2. Find Target Platform by typing Tar in the filter box:
    image
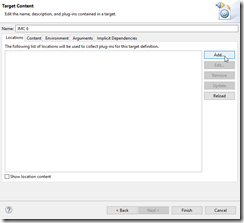
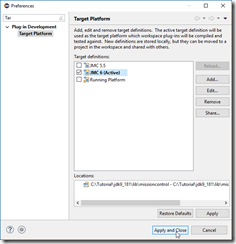
  3. Click Add… and type JMC 6 as name.
    image
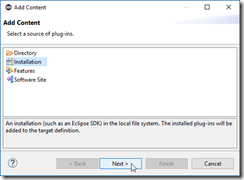
  4. Press Add… and select Installation. Hit Next.
    image
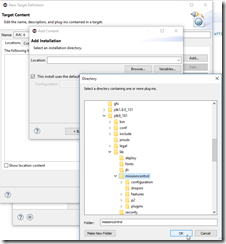
  5. Browse to the JMC 6 installation directory (JDK_9_HOME/lib/missioncontrol), and hit Ok.
    SNAGHTML1538a63d
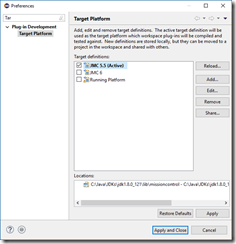
  6. Hit Finish, and Finish. You should now see your new platform.
    image
  7. Select the new JMC 6 platform, and hit Apply and Close to activate it.
    image

Everything should now compile cleanly. Next step is to run JMC with your new rule.

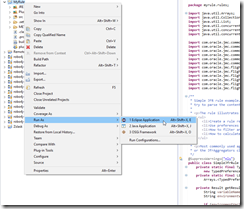
  1. Context click on your project and select Run as Eclipse Application
    SNAGHTML153e5cb4
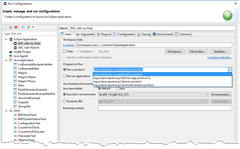
  2. This should normally be it. If you for some reason run into trouble, go to Run Configurations, and make sure that your launcher is using the com.oracle.jmc.rcp.application.product.
    SNAGHTML1540e14b

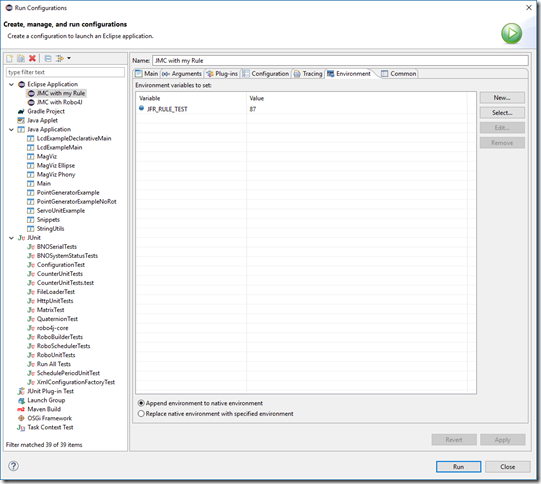
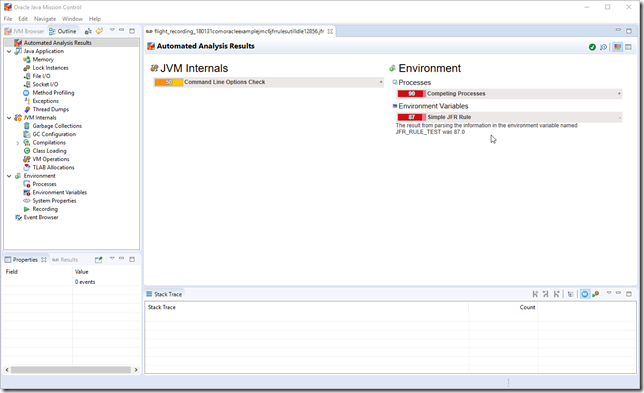
You should now be able to see your rule in action. If you have not changed the rule code, try setting the environment variable in the launcher to various values between 0 and 100 and see what happens when you run the rule in JMC:
image

image

Exporting a Plug-in

You can export your rule by context-clicking on the project and selecting Export. In the Export wizard, select Deployable plug-ins and Fragments.

image 

Click Next, select a folder to export the plug-in to and Finish. The resulting jar can either be put on the class path to be included in the headless analysis, or put in the dropins folder of any Java Mission Control installation where you would want the rule to be available.

Summary

This blog described how to:

  • Get started using the JMC core libraries to read Java Flight Recordings (JDK 7, 8 and 9)
  • Get started doing headless analysis of Java Flight Recordings (JDK 7, 8 and 9)
  • Get started creating custom rules for analyzing Java Flight Recordings

Hope it helps someone!