Using the JVM Performance Counters

So, in JRockit there was this neat little dynamic MBean from which you could access all the JVM performance counters as attributes. Tonight I ended up in an e-mail thread leading me to think about how to retrieve the HotSpot ones. This is of course all very unsupported, and counter names/content and even the very API is subject to change at any given release. I am providing this information mostly as a reminder to myself. Who knows, someone might find this useful.

I will now go ahead and show how something similar to the PerformanceCounters MBean available in JRockit can be built. I recommend against doing this in any kind of production scenario, as the PerformanceCounter API is totally unsupported. Please don’t ask me what a certain counter means – you probably shouldn’t be using these in the first place. This is all for lolz. 🙂

Here comes the usual disclaimer:

The following blog entry will describe UNSUPPORTED functionality. This means that relying on the described APIs or functionality may BREAK your code/plugin with any given update of the JDK and/or Mission Control.

Performance Counter Hello World

If you ever used JRockit, you may fondly remember the old jrcmd utility, which now exists in a HotSpot incarnation as jcmd. Well, jrcmd had an option, –l, which would list all the the performance counters in the target JVM. The following code will let you implement something similar to the jrcmd –l command. Note that the PerformanceCounter API resides in a package most IDEs will restrict access to. You will need to change your project settings accordingly for the following to compile.

Anyways, here is a hack to list all the performance counters for a particular PID:

import java.io.IOException;
import java.nio.ByteBuffer;

import sun.management.counter.Counter;
import sun.management.counter.perf.PerfInstrumentation;
import sun.misc.Perf;

public class PerfCounterTest {

    public static void main(String[] args) throws IOException {
        if (args.length != 1) {
            System.out.println(“Usage: PerfCounterTest <PID>”);
            System.exit(2);
        }
        Perf p = Perf.getPerf();
        ByteBuffer buffer = p.attach(Integer.parseInt(args[0]), “r”);
        PerfInstrumentation perfInstrumentation = new PerfInstrumentation(buffer);
        for (Counter counter : perfInstrumentation.getAllCounters()) {
            System.out.println(String.format(
                    “%s = %s [Variability: %s, Units: %s]”, counter.getName(),
                    String.valueOf(counter.getValue()),
                    counter.getVariability(), counter.getUnits()));
        }

    }
}

Note that you will need the “sun.misc.Perf.getPerf” permission to be able to access the Perf instance when running with a security manager.

From here to a fully functional Dynamic MBean, the step is pretty short.

PerformanceCounterMBean á la JRockit for HotSpot

Here is an example of how code exposing the Performance Counters as a Dynamic MBean can look like:

import java.io.IOException;
import java.nio.ByteBuffer;
import java.util.ArrayList;
import java.util.Collection;
import java.util.HashMap;
import java.util.List;
import java.util.Map;

import javax.management.Attribute;
import javax.management.AttributeList;
import javax.management.AttributeNotFoundException;
import javax.management.DynamicMBean;
import javax.management.InvalidAttributeValueException;
import javax.management.MBeanAttributeInfo;
import javax.management.MBeanException;
import javax.management.MBeanInfo;
import javax.management.MalformedObjectNameException;
import javax.management.ObjectName;
import javax.management.ReflectionException;
import javax.management.RuntimeOperationsException;

import sun.misc.Perf;
import sun.management.counter.Counter;
import sun.management.counter.perf.PerfInstrumentation;

public class PerfCounters implements DynamicMBean {
    public final static ObjectName MBEAN_OBJECT_NAME;
    public final Map<String, Counter> counterMap;
    private final MBeanInfo info;

    static {
        MBEAN_OBJECT_NAME = createObjectName(“se.hirt.management:type=PerfCounters”);
    }

    public PerfCounters() {
        counterMap = setUpCounters();
        info = createMBeanInfo();
    }

    @Override
    public Object getAttribute(String attribute)
            throws AttributeNotFoundException, MBeanException,
            ReflectionException {
        if (attribute == null) {
            throw new RuntimeOperationsException(new IllegalArgumentException(
                    “The attribute name cannot be null.”),
                    “Cannot invoke getAttribute on ” + MBEAN_OBJECT_NAME
                            + ” with null as attribute name.”);
        }
        Counter c = counterMap.get(attribute);
        if (c == null) {
            throw new AttributeNotFoundException(
                    “Could not find the attribute ” + attribute);
        }
        return c.getValue();
    }

    @Override
    public void setAttribute(Attribute attribute)
            throws AttributeNotFoundException, InvalidAttributeValueException,
            MBeanException, ReflectionException {
        if (attribute == null) {
            throw new RuntimeOperationsException(new IllegalArgumentException(
                    “The attribute name cannot be null.”),
                    “Cannot invoke setAttribute on ” + MBEAN_OBJECT_NAME
                            + ” with null as attribute name.”);
        }
        Counter c = counterMap.get(attribute);
        if (c == null) {
            throw new AttributeNotFoundException(
                    “Could not find the attribute ” + attribute + “.”);
        }
        throw new RuntimeOperationsException(
                new UnsupportedOperationException(),
                “All attributes on the PerfCounters MBean are read only.”);
    }

    @Override
    public AttributeList getAttributes(String[] attributes) {
        AttributeList attributeList = new AttributeList();
        for (String attribute : attributes) {
            try {
                attributeList.add(new Attribute(attribute,
                        getAttribute(attribute)));
            } catch (AttributeNotFoundException | MBeanException
                    | ReflectionException e) {
                // Seems this one is not supposed to throw exceptions. Try to
                // get as many as possible.
            }
        }
        return attributeList;
    }

    @Override
    public AttributeList setAttributes(AttributeList attributes) {
        // Seems this one is not supposed to throw exceptions.
        // Just ignore.
        return null;
    }

    @Override
    public Object invoke(String actionName, Object[] params, String[] signature)
            throws MBeanException, ReflectionException {
        throw new MBeanException(new UnsupportedOperationException(
                MBEAN_OBJECT_NAME + ” does not have any operations.”));
    }

    @Override
    public MBeanInfo getMBeanInfo() {
        return info;
    }

    private static ObjectName createObjectName(String name) {
        try {
            return new ObjectName(name);
        } catch (MalformedObjectNameException e) {
            // This will not happen – known to be wellformed.
            e.printStackTrace();
        }
        return null;
    }

    private Map<String, Counter> setUpCounters() {
        Map<String, Counter> counters = new HashMap<>();
        Perf p = Perf.getPerf();
        try {
            ByteBuffer buffer = p.attach(0, “r”);
            PerfInstrumentation perfInstrumentation = new PerfInstrumentation(
                    buffer);
            for (Counter counter : perfInstrumentation.getAllCounters()) {
                counters.put(counter.getName(), counter);
            }
        } catch (IllegalArgumentException | IOException e) {
            System.err.println(“Failed to access performance counters. No counters will be available!”);
            e.printStackTrace();
        }
        return counters;
    }

    private MBeanInfo createMBeanInfo() {
        Collection<Counter> counters = counterMap.values();
        List<MBeanAttributeInfo> attributes = new ArrayList<>(counters.size());
        for (Counter c : counters) {
            if (!c.isVector()) {
                String typeName = “java.lang.String”;
                synchronized (c) {
                    Object value = c.getValue();
                    if (value != null) {
                        typeName = value.getClass().getName();
                    }
                }
                attributes.add(new MBeanAttributeInfo(c.getName(), typeName,
                        String.format(“%s [%s,%s]”, c.getName(), c.getUnits(),
                                c.getVariability()), true, false, false));
            }
        }
        MBeanAttributeInfo[] attributesArray = attributes.toArray(new MBeanAttributeInfo[attributes.size()]);
        return new MBeanInfo(
                this.getClass().getName(),
                “An MBean exposing the available JVM Performance Counters as attributes.”,
                attributesArray, null, null, null);
    }
}

And here is a little test application that registers the MBean with the platform MBean server and then waits around, giving you an opportunity to hook up with Mission Control and try it out:

import java.io.IOException;
import java.lang.management.ManagementFactory;

import javax.management.InstanceAlreadyExistsException;
import javax.management.MBeanRegistrationException;
import javax.management.NotCompliantMBeanException;

public class PerfCounterMBeanRunner {

    public static void main(String[] args) throws InstanceAlreadyExistsException, MBeanRegistrationException, NotCompliantMBeanException, IOException {
        ManagementFactory.getPlatformMBeanServer().registerMBean(new PerfCounters(), PerfCounters.MBEAN_OBJECT_NAME);
        System.out.println(“Press enter to quit!”);
        System.in.read();
    }

}

If you use the JMX Console to connect to a JVM where the PerfCounters MBean is registered, you should be able to find the PerfCounters MBean using the MBean Browser. There should be quite a few performance counters available:

JMC_perf_counters

Conclusion

Sample code for using the proprietary JVM performance counter API was provided, as well as example code on how to implement a version of the old jrcmd –l command, as well as the old PerformanceCounter MBean of JRockit. Again, these examples are using proprietary APIs that may break at any given release. Use responsibly!

jrockit_duke_love

Stronger Crypto for Your Passwords in JMC

If you would like to use a stronger PBE cipher than triple DES & SHA-1 for storing passwords in JMC, this is how to go about it:

    1. Download a crypto provider containing the cipher you want. For example the latest provider jar from Bouncy Castle (at the time of writing, this was bcprov-jdk15on-150.jar)
    2. Copy the jar to JAVA_HOME/jre/lib/ext
    3. Edit your JAVA_HOME/jre/lib/security/java.security file to include the Bouncy Castle provider. Look for the security.provider entries and add a new entry:

      security.provider.N=org.bouncycastle.jce.provider.BouncyCastleProvider
      , where N is the number of the last entry plus one, for example:

      security.provider.11=org.bouncycastle.jce.provider.BouncyCastleProvider

    4. For access to the strongest ciphers, download the Java Cryptography Extension (JCE) Unlimited Strength Jurisdiction Policy Files for your JDK version (this one for example), and unpack the two jar files into JAVA_HOME/jre/lib/security/.

Finally you need to select which cipher to use in the preferences (Window | Preferences, click Java Mission Control). Before adding bouncy castle, you should have had something like this:

security_prefs

After adding Bouncy you should see something like this:

bouncy

Good luck!

Accessing 1-wire Protocol Devices from Java

More Raspberry Pi fun with Java! For an Adafruit LCD Shield library, check out my previous blog.

So, instead of just playing around for fun, I decided to actually do something useful. In this case I wanted a little remote sensor station, which I can plug-in wherever I want to, and communicate with over http over GSM.

Building It

First of all you need to bunker up on as many DS18B20s and as many AM2302/DHT11/DHT22’s you think you’ll need. There are plenty of articles out there on how to configure them. I decided to do it a tiny bit differently to most examples by hooking up the power pin to the 5V rail (both since the specs indicate that you can run longer cable lengths if you do so and since more current can be sourced from the 5V rail). The data is pulled up to the 3.3V rail, just like in all the examples. Note that a bunch of DS18B20s can be hooked up in parallel and communicated with over a single GPIO port. Also note that this is NOT possible with the DHT sensors, which will need one GPIO port per sensor.

Ultimately I decided to have two (optional) DS18B20s and one AM2302 on my board, and I used an Adafruit Perma Proto to hook it all up. Mostly because they are pretty. 😉 To connect the AM2302, I used a Molex jumper assembly, and for the DS18B20s I decided to use RJ-11s. I can highly recommend the RJ-11s! The connectors take a bit of space on the card, and they do require you to mutilate the poor Perma Proto a bit (drill larger holes), but attaching/removing sensors is a joy. Here is a picture of the thingy with all the sensors connected:

sensor_board

In my build I will also use an LCD shield for local control and readouts without necessarily having access to a monitor. I also added a few buttons and LEDs, mostly to satisfy my youngest son.

I guess those could come in handy for diagnostics later. 🙂

Now, the 1-wire protocol used by the DS18B20 (Dallas 1-wire) and the 1-wire protocol used by the DHT sensors (AM2302, DHT11, DHT22) are quite different. Both of these require a bit of time sensitive bit-banging. Fortunately, that work has already been done for us.

For the DS18B20 there are two modules available which will expose all the DS18B20s as files under /sys/bus/w1/devices. Simply add w1-gpio and w1-therm to /etc/modules. Note that you must have the DS18B20s on GPIO port 4 for the module to work.

For the DHT sensors there is no module, but I’ve adapted the Adafruit native library described here, to create a native library for Java. Read the README.txt provided in the zip for more information.

Java Access

Once you have added the modules and put native libraries on the library path, there is only a tiny bit of configuration left to do. The library should automatically discover all DS18B20s you have. If you only happen to have one AM2302 on GPIO-pin 22, you are good to go. If not, you need to edit the property file dhtsensors.properties in the w1.jar to correspond to your setup:

# Specify devices to use with the dht library in this file.
# If you have no such devices, just comment everything out.
#
# Type can be one of the following:
# 2302 (for AM2302)
# 11 (for DHT-11)
# 22 (for DHT-22)
sensor0.pin=22
sensor0.type=2302

If you have no DHT sensors, simply comment out the lines. If you have more than one, simply add two more lines for every sensor, indicating which type and what pin they are on. For example:

sensor0.pin=22
sensor0.type=2302
sensor1.pin=23
sensor1.type=2302
sensor2.pin=24
sensor2.type=22

To test that everything is set up properly, simply run:

sudo java -Djava.library.path=<library path> –jar w1.jar

Note that Pi4J isn’t needed on the classpath. We’re relying on the native library and the w1-gpio mod to provide the necessary interfaces.

The output should look something along the lines of this:

Found 4 sensors!

Temperature(28-000004f7960a):23,38°C
Temperature(28-000004f78caf):23,56°C
Temperature(2302@22-temperature):23,00°C
Humidity(2302@22-hygrometer):36,50%

Temperature(28-000004f7960a):23,38°C
Temperature(28-000004f78caf):23,56°C
Temperature(2302@22-temperature):23,00°C
Humidity(2302@22-hygrometer):36,50%

Temperature(28-000004f7960a):23,44°C
Temperature(28-000004f78caf):23,56°C
Temperature(2302@22-temperature):23,10°C
Humidity(2302@22-hygrometer):36,50%

Library Usage

The code is very simple. To get all the sensors, do:

Set<Sensor> sensors = Sensors.getSensors();

To print the sensors like in the example, do:

System.out.println(String.format(“Found %d sensors!”, sensors.size()));
while (true) {
    for (Sensor sensor : sensors) {
        System.out.println(String.format(“%s(%s):%3.2f%s”, sensor.getPhysicalQuantity(),
                                     sensor.getID(), sensor.getValue(), sensor.getUnitString()));
        Thread.sleep(1000);
    }
    System.out.println(“”);
    System.out.flush();
}       

That’s really all there is to it.

Conclusion

A simple Java library to read a few different kinds of temperature and hygrometer sensors was introduced.

Downloads:

Monitoring LEGO Mindstorms with Java Mission Control

Since release 7u40, Java can run on LEGO Mindstorms EV3. In this post the JMC Team will explore how to use Java Mission Control to monitor Java applications running on Mindstorms. This post is a guest post by the JMC Team.

What We Have Done

Our primary goal was to show that we can monitor a Java application running on a Java SE embedded platform over JMX.
We started off by unpacking our LEGO Mindstorms kit and built the demo robot which was a good way to get to know the components. A simple demo program was present in the default firmware so it was quite easy to get it to run.

EV3-robot

When we had familiarized ourselves with the different sensors and motors we moved on to actually running Java on the system. The leJOS project provides a Linux distribution that can run on Mindstorms and a set of libraries to control just about anything you can connect to the system.

After installing leJOS we verified that we could run Java programs and monitor them using Java Mission Control. Finally we wrote a program that allowed us to control the robot using the MBean management functionality in Java Mission Control.

Running Java programs on Mindstorms

What you need:

  • LEGO Mindstorms EV3
  • A MicroSD card
  • An SD card reader
  • A USB WiFi adapter that is supported by leJOS
    We used a Netgear WNA1100 adapter which is identical to the official LEGO WiFi adapter. A list of alterative adapters can be found at http://www.rjmcnamara.com/lego-mindstorms-ev3/mindstorms-ev3-compatible-wi-fi-dongles/ but we have not tested any of them. It is worth pointing out that the adapter we used sticks out quite a bit so it has to be considered when choosing what to build.
  • A WiFi network with a DHCP server
    Just about any WiFi router should work.
  • A Linux computer to use for writing the leJOS system to the SD card
    If you don’t have a Linux computer you can follow the guide at http://sourceforge.net/p/lejos/wiki/Running%20Ubuntu%20with%20VirtualBox/ to get a virtual Linux system.
  • A computer for developing and compiling Java programs.

EV3-wifi-sd


Installing leJOS

To run leJOS you need a bootable SD card with leJOS on it. When you turn on the Mindstorms system with this card inserted it will boot the leJOS distribution. If the SD card slot is empty it will boot the default LEGO system. This is very nice since you don’t have to make any permanent changes to the firmware. You only have to remove the card in order to make it behave as a normal Mindstorms system again.

A handy tip is to attach a small piece of tape to the SD card. This makes it much easier to remove the card from the Mindstorms system if you need to update it later or if you want to keep several cards with different contents.

To install leJOS on an SD card, follow the guide at http://sourceforge.net/p/lejos/wiki/Creating%20a%20bootable%20SD%20card/.
Note that when you insert the SD card into the Linux system for formatting and writing, it is not always clear which device the SD card is using. If the card was mounted automatically you can use the command mount to see which devices are mounted. You can also use the command dmesg to see messages that come when hardware changes are detected. In any event, take care not to select the device for your hard disk.

When the SD card is complete you can start using it:

  • Insert the WiFi USB stick into the USB port on the Mindstorms system
  • Insert the SD card into the SD card slot on the Mindstorms brick and turn it on

If everything worked correctly you will after a while see the leJOS logo and one or two IP addresses on the screen. One is for USB and Bluetooth networking and the other is for WiFi.

 EV3-lejos

Connect to the WiFi IP address using ssh and login as root with no password. This will give you a pretty normal Linux prompt from where you can run your programs.

You can try running a demo program:

cd /home/root/lejos/samples
jrun EV3HelloWorld

This should result in some beeping and blinking.

Development environment

If you follow the instructions at http://sourceforge.net/p/lejos/wiki/Developing%20with%20leJOS/ then you will get an Eclipse development environment where you can do everything from within Eclipse.


Minimum requirements

If you can’t or don’t want to do everything from within Eclipse then you can set up your own environment. For a minimal setup all you need to do is to get hold of the ev3 library.

The first option is to get the latest source files from git. You can do this either by running git clone git://git.code.sf.net/p/lejos/ev3 lejos-ev3 or, if you don’t have git installed, downloading a snapshot of the code from http://sourceforge.net/p/lejos/ev3/ci/master/tree/. The subdirectories contains various libraries and demo projects complete with Eclipse project files. The ev3classes subdirectory contains the source code for the leJOS API so import at least that into your favorite development environment.

You should preferably build the DbusJava and ev3classes projects with ant. This will give you an ev3classes.jar file which should be placed in /home/root/lejos/lib on your Mindstorms system so that you have the same version of the library when you run your programs.

The second option is to take the ev3classes.jar file from the leJOS installation and add it to your classpath. You can find this jar file on your Mindstorms system in /home/root/lejos/lib. Note however that the ev3classes.jar file that is distributed with the leJOS installer is not necessarily the latest so we recommend getting the source code from git and building it yourself if you can.


Development process

In short, the development process consists of these stages:

  • Write a program and compile it on your development system
  • Upload the class or jar files to the Mindstorms system
  • Run the program on the Mindstorms system

If you followed the guide on the lejos wiki then you can follow their instructions. Otherwise, you can use your favorite scp application to transfer files and your favorite ssh terminal to run your programs.
Whichever way you choose, start off with a simple program like this one:

import lejos.hardware.Button;
import lejos.hardware.LCD;

public class HelloWorld {
    public static void main(String[] args) throws Exception {
        LCD.clear();
        LCD.drawString(“Hello World”, 0, 5);
        Button.waitForAnyPress();
        LCD.clear();
        LCD.refresh();
    }
}

Compile the program and create a jar file with the class:

javac -cp ev3classes.jar HelloWorld.java
jar cvf HelloWorld.jar HelloWorld.class

Copy the jar file to the Mindstorms system using scp and start it from an ssh terminal:

jrun -cp HelloWorld.jar HelloWorld


Connecting Java Mission Control to a remote Java process

Java Mission Control is a tool for monitoring and analyzing Java processes. It has been bundled together with JDK since version 7u40. Java Mission Control uses JMX to communicate with remote Java processes. To enable the management agent on a Java process you can add the following parameters when starting it:

-Dcom.sun.management.jmxremote=true -Dcom.sun.management.jmxremote.port=7091 -Dcom.sun.management.jmxremote.authenticate=false -Dcom.sun.management.jmxremote.ssl=false

You can select just about any free port number instead of 7091. If you are running multiple Java processes on the same system then you need to use different ports for each process. Depending on how the leJOS system detects which IP address is the primary one, you may also have to add the following parameter:

-Djava.rmi.server.hostname=The IP address of the Mindstorms WiFi adapter

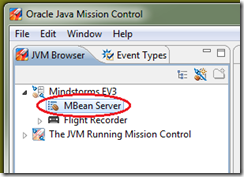
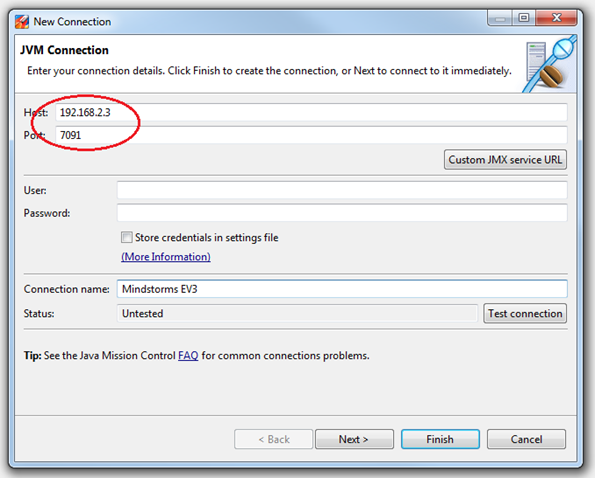
Once the Java process is up and running you can connect to it using Java Mission Control. Add a connection to the Mindstorms IP address and the port number that you chose. Expand your new connection in the JVM browser view and open a JMX Console on the MBean Server.

JMC browser New connection  New connection wizardJMC browser Start JMX Console

 
If everything worked as it should you will see a console window displaying the status of the Java process.

JMX Console 

This procedure is the same for any remote Java process that you want to monitor. Java Mission Control can auto-detect Java processes that can be monitored through a protocol called JDP. You can read more about JDP at https://hirt.se/blog/?p=388.


Monitoring and controlling Mindstorms using MBeans

Now you have a Java process running on the Mindstorms system and you can communicate with it using JMX. This allows you to see a lot of information about what the Java process is doing. The next step is to monitor and control the sensors and motors connected to the Mindstorms system. To do this we implement a custom MBean that expose the leJOS libraries.

You can read more about MBeans and MXBeans at http://docs.oracle.com/javase/tutorial/jmx/mbeans/index.html.


Creating an MBean

An MBean is basically a Java class that implements an interface. Start off by creating the interface:

public interface MotorMXBean {

    public void moveForward();

    public void stopMotor();

    public int getSpeed();

    public void setSpeed(int speed);
}

Then create a class implementing the interface:

import lejos.hardware.motor.NXTRegulatedMotor;

public class Motor implements MotorMXBean {
    final NXTRegulatedMotor m_motor;

    public Motor(NXTRegulatedMotor motor) {
        m_motor = motor;
    }

    @Override
    public void moveForward() {
        m_motor.forward();
    }

    @Override
    public void stopMotor() {
        m_motor.stop();
    }

    @Override
    public int getSpeed() {
        return m_motor.getSpeed();
    }

    @Override
    public void setSpeed(int speed) {
        m_motor.setSpeed(speed);
    }
}

This exposes a small subset of everything that can be done but it will give you an idea of how things work. You don’t have to expose the leJOS library methods directly, often it can be more useful to have more complex operations like ”find a ball” or monitor values like ”number of balls found”.

With the MBeans implemented, it is time to create an instance and register it with the platform MBean server.

import java.lang.management.ManagementFactory;
import javax.management.MBeanServer;
import javax.management.ObjectName;

public class MBeanRunner {
    public static void main(String[] args) throws Exception {
        MBeanServer mbs = ManagementFactory.getPlatformMBeanServer();
        Motor m = new Motor(lejos.hardware.motor.Motor.B);
        ObjectName name = new ObjectName(“lejostest:name=MotorB”);
        mbs.registerMBean(m, name);
        System.out.println(“Server is running. Press enter to exit”);
        System.in.read();
    }
}

This is a very simple program that doesn’t do anything on its own. It registers a motor controller with the MBean server and waits for commands. Compile the classes and place them on the Mindstorms system. Connect a motor to port B on the Mindstorms system and start the program:

jrun -cp Test.jar -Dcom.sun.management.jmxremote=true -Djava.rmi.server.hostname=192.168.2.3 -Dcom.sun.management.jmxremote.port=7091 -Dcom.sun.management.jmxremote.authenticate=false -Dcom.sun.management.jmxremote.ssl=false MBeanRunner

Start Java Mission Control and connect to the Mindstorms system. Go to the MBean Browser and locate the lejostest/MotorB MBean. Go to the Operations tab, select moveForward and click on Execute:

JMC MBean Browser operations

The motor should start running. Go to the Attributes tab and you will see a list of values for all attributes that are exposed with getter methods. Attributes that have setter methods can be set so try clicking on the value for the speed attribute, enter a new value and finish with enter:

JMC MBean Browser attributes

The motor should now change speed. To stop the motor, go back to the operations tab and execute the stopMotor operation.


Conclusion

If you have followed this guide you will have accomplished three things:

  1. Running Java programs on a Mindstorms system
  2. Monitoring a remote Java process with Java Mission Control
  3. Exposing application specific data and operations in an MBean

All of these things can be done independently. You can run Java programs on Mindstorms without monitoring them, any program running on a supported JVM can be monitored with Java Mission Control, and there are other methods of monitoring MBeans.
Enjoy.

More information about Java Mission Control can be found at http://www.oracle.com/missioncontrol.
More information about leJOS can be found at http://www.lejos.org/ and at http://sourceforge.net/projects/lejos/.
Using the Adafruit LCD Shield from Java

We’re interrupting the ordinary programming for a series of Raspberry PI related articles. Yep, I finally bought one and started having some fun.

I know I am sooo late to the party. My excuse is that having really young kids translates into a constant time shortage. That said, I bought myself a Raspberry Pi just in time for some vacation. One of the first things I did was to get an LCD shield for the Raspberry PI. I settled on this particular kit:
http://www.adafruit.com/products/1115

It’s a really nice little LCD kit which also features a few buttons. The shield uses a port extender (MCP23017) to get another 16 GPIO ports over I²C. This is quite nice, since you probably want to use your GPIO ports for other things. Also, you can hook up several I²C devices on the same bus, so using the I²C pins for the LCD shield doesn’t mean that you’ve used them up.

The LCD shield can be run in various different modes. My little example library uses 16×2 characters by default.

Building the Kit

The instructions for building the kit are excellent, and there are just a few things I’d like to note:

  1. Get a stacking header
    I fortunately came to the conclusion I would need a stacking header before soldering everything together, but unfortunately after I had ordered the LCD shield. I am oh so happy I decided to wait for the header to arrive before finally putting the kit together.
  2. If you want to attach a standard flat 26 pin cable, trim out some space in the LCD PCB for the little orientation peg on the cable header 
    This I did not do – I ended up trimming down the cable header with my Dremel instead, since it’s too hard to access that area after soldering on the LCD.
  3. (Optional) Unused GPIO pins for free!
    E.g. GPA5 appears to not be in use. Feel free to use it for your own purposes. The library initializes it as yet another input pin by default, but that is easily changed.
  4. (Optional) Use interrupts for the buttons
    This will cost you a GPIO pin (and you cannot use one of the unused ones on the LCD shield’s MCP23017), but will allow you to poll the button pins a lot less often without risking missing a button press. You may want to do some additional soldering on pin 20 of the MCP23017 – INTA is not hooked up by default. This also requires you to hack my Java code a little bit to initialize GPINTEN, and to read from INTF and INTCAP,

Testing the Kit

Once you’ve built the kit, follow the instructions here to try out the LCD kit using the demo python code. Once you have your LCD shield up and running you can move on to getting everything to run from Java.

Using the LCD Shield from Java

Once everything is working from python, you are ready to run things from Java. I mostly did a straight port of the Python library.

  1. First download and install Pi4J
    This will be required for most future posts I might put on the blog.
  2. Next download lcd.jar
    The source is available with lcd_src.zip.

Now you can run the included demos by just invoking the jar like this:
sudo java –Xbootclasspath/a:/opt/pi4j/lib/pi4j-core.jar –jar lcd.jar

lcd2

When running the demos, use the up/down buttons to select a demo, then press select to run a demo. When the demo is done, use up/down to select a new demo.

API Examples

Here is how the API can be used to show some text:

LCD lcd = new LCD();
lcd.setText("Hello World!\n2nd Hello World!");

Here is an example with some buttons:

final LCD lcd = new LCD();
lcd.setText("LCD Test!\nPress a button...");
ButtonPressedObserver observer = new ButtonPressedObserver(lcd);
observer.addButtonListener(new ButtonListener() {
    @Override public void onButtonPressed(Button button) {
        lcd.clear();
       
lcd.setText(button.toString());
    }
});

For more examples, check out the demos in the se.hirt.pi.adafruitlcd.demo package. I currently have most of the implementation in my python port LCD class. Anything that isn’t purely reading/setting registers, I’ve handled outside of that class (such as the polling of buttons). If I ever find some time I might clean up the API and move away from the current python port.

Tips and Tricks

  • If you want to teach the LCD to do additional tricks, the LCD controller used is the HD44780
    Note that it might be valuable to read the spec if for no other reason than to understand the limits (e.g. quite small DDRAM buffer).
  • MCP23017 is an awesome little thing
    Ever wanted more GPIO ports? Using the MCP23017 is one way to get plenty more. Just remember to provide a unique address by configuring A0-A2 (see page 8 of the spec). Connecting them all to ground will yield 0x20 (which is what the LCD shield uses). Hooking them all up to 5v will yield 0x27.
  • Be careful with how much current you source/sink, both using the MCP23017 (25mA) and the RPi (16mA GPIO, 50mA 3.3v rail, 5V rail pretty much depends on your power supply). If you need to source/sink more than the IO pins can handle, you can use a Darlington Array, for example ULN2803.

Parsing Flight Recordings – an Example

This blog post is the third in a series of posts on using unsupported functionality in the Oracle JDK and/or Java Mission Control.

I will use the JMC flight recorder parser in this example, and since the JMC parser is unsupported I’ll just go ahead and use my usual disclaimer:

The following blog entry will describe UNSUPPORTED functionality. This means that relying on the described APIs or functionality may BREAK your code/plugin with any given update of the JDK and/or Mission Control.

I strongly recommend against using these APIs in production code. There will be supported APIs for reading reading recordings eventually and they may be quite different to what I show here. Also note that older versions of the parsers are not guaranteed to be forward compatible with newer versions of the binary format. In short, this is NOT supported and WILL CHANGE!

You may want to first read the introduction to the JFR parsers and about the relational key before continuing.

Ready? Here we go…

A Flight Recording

First off we need a recording to parse. If you have your own favourite recording, you’re all set. If you don’t you can have mine. The recording I linked to is a recording of WLS running the MedRec example app with some load. The benefit of using that recording is that it, aside from the standard events, also contains events provided by the Java API for creating third party events (by the WebLogic Diagnostics Framework). Quite useful events, all bound together using the relational key in various ways. Don’t forget to unzip the recording before use.

The recording is pretty new and really requires a JMC 5.3.0 with the WLS plug-in for the best result. JMC 5.3.0 has not been released yet, but don’t worry; this blog entry will not even require you to start JMC.

That said, since all blog posts require a pretty picture, here is one of the servlet invocations in the recording:
servlets

Looking at Metadata

Let’s first write a little program that lists the available event types and their metadata. Use the knowledge obtained in the JFR parser blog entry to obtain a copy of the JMC Flight Recorder Parser.

Next, use the example below to iterate through the metadata and print out the event type name, all the attributes and the relational key for the the individual attributes:

import java.io.File;
import java.util.Collection;

import com.jrockit.mc.flightrecorder.FlightRecording;
import com.jrockit.mc.flightrecorder.FlightRecordingLoader;
import com.jrockit.mc.flightrecorder.spi.IEventType;
import com.jrockit.mc.flightrecorder.spi.IField;

public class FlightRecorderMetaData {
    public static void main(String[] args) throws ClassNotFoundException {
        FlightRecording recording = FlightRecordingLoader.loadFile(new File("C:\\demo\\wldf.jfr"));

        for (IEventType type : recording.getEventTypes()) {
            System.out.println(type.getName());
            printAttributes(type.getFields());
        }
    }

    private static void printAttributes(Collection<IField> fields) {
        for (IField field : fields) {
            System.out.println(String.format("   %s (relkey: %s)", field.getName(), field.getRelationalKey()));
        }
    }
}

Here is a slightly more convoluted example, printing everything out in a nice tree, also showing how many events were found per event type plus some additional stats. It takes a flight recording as its only argument.

Using the Relational Key

Looking at the metadata for the WLDF recording, it can be seen that a lot of the event attributes provided with the WLDF specific events are actually using the relational key for various different things. There is a relational key for servlet URIs, there is another one for the ECID (Enterprise Context ID) and so on. Let’s say we wanted to find all the events with a relational key for ECID, and then group them on ECID (effectively grouping the events per transaction). That could look something like this:

import java.io.File;
import java.util.ArrayList;
import java.util.Collection;
import java.util.HashMap;
import java.util.LinkedList;
import java.util.List;
import java.util.Map;
import java.util.Map.Entry;

import com.jrockit.mc.flightrecorder.FlightRecording;
import com.jrockit.mc.flightrecorder.FlightRecordingLoader;
import com.jrockit.mc.flightrecorder.spi.IEvent;
import com.jrockit.mc.flightrecorder.spi.IEventType;
import com.jrockit.mc.flightrecorder.spi.IField;
import com.jrockit.mc.flightrecorder.spi.IView;

public class FlightRecorderECID {
    private static final String KEY_ECID = "http://www.oracle.com/fmw/ECID";

    public static void main(String[] args) throws ClassNotFoundException {
        FlightRecording recording = FlightRecordingLoader.loadFile(new File("C:\\demo\\wldf.jfr"));    

        Collection<IEventType> ecidTypes = new LinkedList<>();
        for (IEventType type : recording.getEventTypes()) {
            if (type.getPath().startsWith("wls/")) { // just optimization, can remove
                if (hasECID(type)) {
                    ecidTypes.add(type);                   
                }
            }
        }
       
        IView ecidView = recording.createView();
        ecidView.setEventTypes(ecidTypes);
        Map<String, List<IEvent>> eventMap = buildEventMap(ecidView);
       
        System.out.println("ECIDS:");
        for (Entry<String, List<IEvent>> ecid : eventMap.entrySet()) {
            System.out.println(String.format("%s [%d events]", ecid.getKey(), ecid.getValue().size()));
        }
    }

    private static Map<String, List<IEvent>> buildEventMap(IView ecidView) {
        Map<String, List<IEvent>> map = new HashMap<>();
        for (IEvent event : ecidView) {
            String ecid = getEcid(event);
            if (ecid != null) {
                addToMap(map, ecid, event);
            }
        }
        return map;
    }

    private static void addToMap(Map<String, List<IEvent>> map, String ecid, IEvent event) {
        List<IEvent> eventList = map.get(ecid);
        if (eventList == null) {
            eventList = new ArrayList<>();
            map.put(ecid, eventList);
        }
        eventList.add(event);
    }

    private static String getEcid(IEvent event) {
        IField ecidField = getEcidField(event.getEventType());
        if (ecidField == null) {
            return null;
        }
        return String.valueOf(ecidField.getValue(event));
    }

    private static boolean hasECID(IEventType type) {
        return getEcidField(type) != null;
    }

    private static IField getEcidField(IEventType type) {
        for (IField field : type.getFields()) {
            if (field.isRelational() && KEY_ECID.equals(field.getRelationalKey())) {
                return field;
            }
        }
        return null;
    }
}

The output should look something like this:

8ec006a7-30e9-4fac-be7f-716f42d3cbc8-00000ed0 [1 events]
8ec006a7-30e9-4fac-be7f-716f42d3cbc8-00000237 [45 events]
8ec006a7-30e9-4fac-be7f-716f42d3cbc8-00000236 [2 events]
8ec006a7-30e9-4fac-be7f-716f42d3cbc8-00000d58 [2 events]
8ec006a7-30e9-4fac-be7f-716f42d3cbc8-0000022a [2 events]
8ec006a7-30e9-4fac-be7f-716f42d3cbc8-0000022d [2 events]
8ec006a7-30e9-4fac-be7f-716f42d3cbc8-0000022c [12 events]

Running the same example but using the relational key for URI (http://www.oracle.com/wls/Servlet/servletName) will look something like this:

/console/index.jsp [10 events]
/_async/AsyncResponseService [195 events]
/medrec/registerPatient.action [90 events]
/physician-web/physician/addPrescription.action [448 events]
/console/images/button_bg_mo.png [7 events]
/physician-web/physician/viewPatients.action [432 events]
/medrec/admin/home.action [48 events]
/console/jsp/changemgmt/ChangeManager.jsp [9 events]
/physician-web/physician/createRecord.action [720 events]
/medrec-jaxws-services/PatientFacadeService [275 events]
/medrec-jaxrpc-services/JaxRpcRecordCreationFacadeBroker [235 events]

Conclusion

This blog provided some examples on how to read out metadata from a flight recording and a simple example showing the use of the relational key.

The Relational Key

This blog post explains the relational key – a little piece of event attribute metadata that is used to associate attributes in different event types with each other. This is a quick break in my series of posts about unsupported functionality, the reason for the break being that you will need to be armed with this knowledge for my next instalment in that series. Blinkar

The Relational Key

The relational key is a little piece of event type attribute metadata on the form of an URI. It is normally used as a marker to hint to JMC that it often makes sense to find all events (of different event types) with the same attribute value for attributes with the same relational key. For example, the Java Flight Recorder has quite a lot of different GC events. Almost all of them are related to a certain GC ID. It often makes sense to find all events related to the same GC ID. The picture below lists some common GC events, and their attribute metadata.

metadata

The relational key can be seen in action in how Mission Control presents the alternatives for the Operative Set. If you go to the GC view, pick a garbage collection and open the context menu, you will find that there is an option to add all the events with the same GC ID to the operative set.

gcs

Moving over to the events tab, and selecting to only show the operative set, a range of different events, all associated with that particular garbage collection, can be seen.

associated

Another very useful example is the ECID attribute in the events produced by the WebLogic Diagnostics Framework (see the “Putting it All Together” section of my post about the Operative Set).


Conclusion

The relational key is a handy little piece of attribute metadata that is used to give hints to the JMC user interface that different event types are related to each other. It is used by Mission Control to, for example, control what attributes are listed in the Operative Set context menu.

Using the Flight Recorder Parsers

This blog post is the second in a series of posts on using unsupported functionality in the Oracle JDK and/or Java Mission Control.

Just as there is no supported way to add custom events to the Java Flight Recorder (yet), there is even less in terms of programmatic support to read recordings. There are however two different unsupported parsers available. Both are POJO APIs, and except for supportability / future API breakage issues, there is in practice nothing stopping you from using either one to read your recordings.

Disclaimer:

The following blog entry will describe UNSUPPORTED functionality. This means that relying on the described APIs or functionality may BREAK your code/plugin with any given update of the JDK and/or Mission Control.

I strongly recommend against using these APIs in production code. There will be supported APIs for reading reading recordings eventually and they may be quite different. Also note that older versions of the parsers are not guaranteed to be forward compatible with newer versions of the binary format. In short, this is NOT supported and WILL CHANGE!

That said, it can sometimes be quite useful to have programmatic access to flight recorder data. One could, for example, do automatic filtering and/or reporting on recordings, and then use JMC to do detailed analysis on the ones that are flagged as interesting.

The Reference Parser

The reference parser shipped with the Oracle JDK can be likened to a SAX XML parser. It allows you to iterate through the recording, uses little memory, is somewhat limited, and provides a very simple Java model. If your needs are simple, this may be the perfect parser to use. It is available by default in JDK 7u4 and later. The parser API is located in the JDK_HOME/jre/lib/jfr.jar file.

Here is an example snippet that iterates through a recording and prints out the total event count:

import java.io.File;
import java.io.IOException;
import java.util.Iterator;

import oracle.jrockit.jfr.parser.*;

public class JDKParserTest {
    @SuppressWarnings("deprecation")
    public static void main(String[] args) throws IOException {
        File recordingFile = new File("C:\\demo\\wldf.jfr");
        Parser parser = new Parser(recordingFile);
        int count = 0;
        Iterator<ChunkParser> chunkIter = parser.iterator();
        while (chunkIter.hasNext()) {           
            ChunkParser chunkParser = chunkIter.next();
            for (FLREvent event : chunkParser) {
                count++;
                //System.out.println(event.toString());
            }
        }
        parser.close();
        System.out.println("Found " + count + " events");
    }
}   

I will not spend too much time on this parser.

Strengths:

  • Uses little memory
  • Included in the Hotspot JDK (>=7u4)

Weaknesses:

  • Slow
  • Simple model/API

The JMC Parser

If the reference parser is the SAX XML parser equivalent, then the JMC parser is the DOM equivalent. The jar for the parser is easily nicked from the JMC distribution, either from the update site or from the JDK installation. In the JDK, you’ll find the jar containing the JMC flight recorder parser at JDK_HOME/lib/missioncontrol/plugins/com.jrockit.mc.flightrecorder_<version>.jar.

You will also need to add the JDK_HOME/lib/missioncontrol/plugins/com.jrockit.mc.common_<version>.jar to your path.

Here is the equivalent event counting example using the JMC parser:

import java.io.File;

import com.jrockit.mc.flightrecorder.FlightRecording;
import com.jrockit.mc.flightrecorder.FlightRecordingLoader;
import com.jrockit.mc.flightrecorder.spi.IEvent;
import com.jrockit.mc.flightrecorder.spi.IView;

public class FlightRecorderParserTest {
    public static void main(String[] args) throws ClassNotFoundException {
        FlightRecording recording = FlightRecordingLoader.loadFile(new File("C:\\demo\\wldf.jfr"));    
        IView view = recording.createView();

        int count = 0;
        for (IEvent event : view) {
            count++;
        }
        System.out.println("Fount " + count + " events");
    }
}

Strengths:

  • Fast
  • The jar can be used with any JDK (>=6)
  • Rich API
  • Good for complex analysis scenarios

Weaknesses:

  • Builds a Java model of the recording – uses more memory

Summary

This blog post lists two different UNSUPPORTED parsers that can be used to read java flight recordings programmatically from Java. A very simple example showing how to iterate through the events in a recording was shown for both of the parsers.

Creating Custom JFR Events

This blog post is the first in a series of posts on using unsupported functionality in the Oracle JDK and/or Java Mission Control.

Since the 7u40 version of the Oracle JDK, the Java Flight Recorder provides a wealth of information about the operating system, the JVM and the Java application running in the JVM. To make the wealth of information easier to digest, it can often be quite useful to provide some contextual information to the events available from the Flight Recorder. For instance, WebLogic Diagnostics Framework integrates with the Flight Recorder to add information about requests, and there are trial projects that add information about JUnit tests run, JavaFX pulse logger information and more. Having that contextual information makes it much easier to get a good starting point for where you want to study the recording in more detail, for instance homing in on the longest servlet requests taking the longest time to complete.

This blog will show how to use the Flight Recorder Java API to record your own data into the Java Flight Recorder.

Disclaimer:

The following blog entry will describe UNSUPPORTED functionality. This means that relying on the described APIs or functionality may BREAK your code/plugin with any given update of the JDK and/or Mission Control.

I strongly recommend against using these APIs in production code. There will be supported APIs for recording custom events into the Java Flight Recorder eventually and they will likely be quite different. Also note that code using these APIs will require an Oracle JDK >= 7u4, both at compile and run-time. And finally, note that the entire API for recording your own events entered the Oracle JDK deprecated. This is NOT supported, and WILL CHANGE!

That said, I still think it is valuable to share this information since:

  • Sometimes having this ability can mean the difference between solving a problem in a reasonable time and not.
  • This is an API for recording information. If proper care is taken, you can insulate yourself from the effects of not having the API available at runtime. This will never be the kind of API that is critical to the execution of your application. That said, the API and having access to the flight recorder infrastructure can be pretty addictive if you’re interested in production time profiling and diagnostics. Blinkar
  • There are plenty of opportunities where you can use this API to a great advantage without even touching your application code. For example, having an event type for unit tests or maybe coding your own BCI agent to insert the code required to emit events on the fly.
  • Getting some early feedback on these APIs would be quite helpful.

Different Kind of Events

Before we start recording events, we must discuss the different kind of event types available. There are currently four different ones:

    1. Instant events
      These are events with only one time – the time the event occurred.
    2. Requestable events
      These are events with a user configurable period.
    3. Duration events
      These are events that have a start and end time (a duration).
    4. Timed events
      These are duration events with a user configurable threshold. If an event has a duration shorter than the defined threshold, it will not be recorded.

To record events we need to define two things:

    1. A producer
      The producer is basically some metadata and a namespace for your events. In the Java API, you will register your event types with the producer. Once the producer is no longer referenced, your associated event types will be cleared. Do NOT lose the reference to your producer.
    2. One or more event types
      In event types you define the metadata used to describe the events as well as the attributes (data) available.

Defining the Producer

To define a producer, simply instantiate a Producer instance:

Producer myProducer = new Producer("Demo Producer", "A demo event producer.", http://www.example.com/demo/);

The producer is simply defined using a name – the name is what will be shown to the user in the JMC GUI, a description and an identifier. The identifier is on an URI format.

Next we must register the producer:

myProducer.register();

After making sure to keep a reference to the producer, we can start defining the event types.

Defining an Event Type

Event types are defined using a Java class, with annotations used to declare metadata. Step one is to subclass the class appropriate for the kind of event you want, for example a timed event. Next you need to decide what attributes (data) should be available in the events. The following example declares an event type named My Event, with a single attribute named Message:

@EventDefinition(path = "demo/myevent", name = "My Event", description = "An event triggered by doStuff.", stacktrace = true, thread = true)
private class MyEvent extends TimedEvent {
    @ValueDefinition(name = "Message", description = "The logged important stuff.")
    private String text;

    public MyEvent(EventToken eventToken) {
        super(eventToken);
    }

    public void setText(String text) {
        this.text = text;
    }
}

Registering the Event Type

Next you have to register the event type with the producer. The registration method returns something called an event token. Keeping a reference to the event token and using it as an argument to the construction of an event instance is much more efficient than using the default event constructor. Here is how you may go about registering your event:

EventToken myToken = myProducer.addEvent(MyEvent.class);

Emitting Events

Now we’re ready to start emitting our event. This is very easily done:

    1. Construct an instance of the event (or reuse a previous instance, as discussed later).
    2. Call the start method to take the start timestamp.
    3. Set the attributes you wish to set.
    4. Call the end method to take the end timestamp.
    5. Set some more attributes if necessary.
    6. Call the commit method to commit the event to the recording engine.

So this is how it would look in code:

public void doStuff() {
    MyEvent event = new MyEvent(myToken);
    event.begin();
    String importantResultInStuff = "";
    // Generate the string, then set it...
    event.setText(importantResultInStuff);
    event.end();
    event.commit();
}


Now, you may come to the conclusion that this will cause an object allocation for each event. If you would rather not allocate a new object for each event, you can reuse one of them, like this:

private MyEvent event = new MyEvent(myToken);
public void doStuffReuse() {
    event.reset();
    event.begin();
    String importantResultInStuff = "";
    // Generate the string, then set it...
    event.setText(importantResultInStuff);
    event.end();
    event.commit();
}

(The only difference is that you need to remember to reset the event between each invocation.)

Conclusion

There is a Java API for adding events to the Java Flight Recorder available in the Oracle JDK since 7u4. It is NOT SUPPORTED, and it will change. That said, it can be quite useful for providing contextual information to the rest of the data provided.

I am very interested in feedback on this API. Such feedback will be fed back into a future, officially supported, API.

Using the Operative Set

The Operative Set is an easily overlooked but quite powerful feature in the Mission Control Flight Recorder user interface. It is a selection of events that you can reach and utilize from almost every tab in the Flight Recorder user interface.

This blog will explain how the Operative Set can be used to quickly drill down into a set of events having some very specific properties. The Operative Set may take a bit of time and experimenting to get used to. If you want to try out this feature whilst reading this blog, I’ve made the actual recording used in the examples available here.

Note: If JMC warns you the recording is too large, see this blog post.

Altering the Operative Set

Before we start using the Operative Set, I’ll just note that the tab groups in JMC really are of two different types:

    1. Tab groups specific to one or more specific event types.
      These tab groups are pre-configured to show off specific events. The Event Types view will not affect what is shown in the tab groups.
    2. The general Events tab group.
      The tabs in this tab group will show events of the event types selected in the Event Types view.

The event type specific tabs are usually used to add and remove events of interest to/from the operative set, and the general events can be used to both study and modify the set of events in the operative set. The general Events tabs are also the only way to analyse events of types for which there is no specific user interface. Of course, it is easy to build a new user interface for events where there is no specific user interface yet, but that is for another blog post.

To alter the Operative Set, simply select the events that you want to add/remove and use the context menu. For example, to add the the events for the most contended lock, simply go to the contention tab, right click on the row representing what you’re interested in, go to the Operative Set menu, then choose Add Selection.

image

Voila – the events have now been added to the Operative Set. You can now move over to the general Events tabs to play with them.

Using the Tabs in the Events Tab Group

The first thing to check when moving over to the Events tabs, is to make sure that the events of interest aren’t filtered out. This is done by checking the settings of the Event Type view, which is normally to the left of the Flight Recorder editor.

image

In our case, we have just added Java Monitor Blocked event to the Operative Set, so there isn’t anything else we need to do. When in doubt, enable all event types.

So let’s see what the Events tabs can be used for.

Overview

This tab is a good place to sanity check what you actually have in your operative set. Click the checkboxes for the Operative Set, and you will see what producers the events originate from, as well as the distribution per event type. This page will be quite boring with our current selection of events.

image

Log

The Log is simply a table of the available events. When you select one of the events, all information (attribute values) in the event will be shown to you in the lower half of the tab. Again you can opt to only see what is in the Operative Set. Note that in the 5.2.0 version of Mission Control, this is one of the places where you’ll get to see the actual line number in the stack traces. This means that if you’re not happy with the line number-less traces in the aggregated stack traces, you can always select to add the events you are interested to the operative set, and then look at the events in the log.

image

Graph

The graph view will show you the events in a per thread graph. This is very useful to get a visualization of what is happening in terms of distribution over both threads and time. In our simple example, we can make out what threads are involved in blocking on the log4j logger, as well as the time periods for which we have contention.

image

Threads

The threads simply list the events aggregated per thread. This can be useful for setting the operative set to only the events occurring in a certain thread.


Stack Trace

In this tab the aggregated stack traces for the selected events can be viewed:

image

It can be noted that for the events in our Operative Set (the blocking events), we seem to spending the most time waiting to do tracing rather than debug or info level logging.


Histogram

This tab is not for creating graphical histograms, but rather for grouping events on a specified attribute. In our case we can for instance select to group our events on monitor address, then select to set the operative set to the busiest lock:

image

Then we can, for example, move back to check what threads are involved in locking on the particular lock instance.

The Relational Key

Now, there is something called a relational key in the event metadata for an attribute. The relational key is used to tell that an attribute contains a value that can bind together events of different event types. For instance all the different GC events that are associated with a certain GC ID are connected through a relational key:

image

The Operative Set context menu has a submenu called Add Related Events. That menu will typically try to be helpful by listing attributes that have a relational key. So for instance, to find all GC events that are related to the longest garbage collection taking place in the recording, go to the Memory tab group, select the Garbage Collections tab and sort the GC table on time. Next select the longest recording and choose Operative Set | Add Related Events | With GC ID = (the id of the longest GC in the supplied recording has ID 76).

image

Looking at the log, you can, for example, look at all the related GC events in the log tab:
image


Putting it All Together

So let’s look at what is happening during an invocation of the viewPatients servlet at the different levels of the recording. First go to the servlet tab in the WebLogic tab group, next right click in the table and select Operative Set | Clear. Most WLS events are related to a certain request using something called the ECID (Enterprise Context ID). Let’s next add the events associated with the first found ECID associated with an invocation of viewPatients:

image

Now we can check what was occurring on the WLS level through the request by simply looking at the events in the log. First enable all event types in the Event Type view. Next move over to the Log tab:

image

Lastly, let’s check what was happening with the other available events occurring in the same thread during the same time as these high level WLS events. First select all the events in the log (in the Operative Set) (ctrl-A). Next right click and select add concurrent:

image

You will now see related events such as allocations and exceptions popping up:

image

The other tabs in the Events tab group can of course be used with the new operative set as usual. For example, to get a graphic overview of all the events involved in the request, go to the Graph tab:

image

Summary

The Operative Set is a feature that allows power users of Mission Control to look at events from different angles and quickly home in on related events having certain properties. It is a power user feature – it may take a little bit of getting used to, but once you’re used to it you’ll be scary effective. Blinkar