My JavaOne 2016 Sessions

This year I’ll be doing two sessions and one HoL:

Title: Java Mission Control and JFR in JDK 9: A Sneak Peek [CON1509]

Abstract:
In JDK 9, the JFR APIs will become supported, so you can now rely on the JFR APIs for both controlling Oracle Java Flight Recorder and introducing your own custom JFR data into the recordings. Also, with JDK 9, a new major, very different version of the Oracle Java Mission Control feature of Oracle Java SE Advanced will be released.

This session takes a sneak peek into what the new APIs for controlling the Oracle Java Flight Recorder feature will look like and provides migration guidelines from the old APIs. It also goes through some of the highlights of the completely redesigned Oracle Java Mission Control 6.0.0, such as the automatic analysis of flight recordings. A quick intro to the new bytecode instrumentation agent used internally by Oracle Java Mission Control 6 is also provided.


Title: Using Oracle Java Flight Recorder in an Autonomous Robotic Vehicle [CON1511]

Abstract:
This session shows how the speaker used the Oracle Java Mission Control and Oracle Java Flight Recorder features of Oracle Java SE Advanced to record large quantities of data from the sensors in a little hobby project: a small autonomous robotic vehicle running Oracle Java SE Embedded.

The session focuses on how to use Oracle Java Flight Recorder to great advantage where resources are scarce and where overhead can cause significant problems. It also discusses how to build custom integration for Oracle Java Flight Recorder, using APIs already available in Oracle’s HotSpot JDK, and how the speaker went about designing, 3-D-printing, and building the actual hardware and software.


Title: Java Mission Control 5.5 [HOL1510] (with David Buck)

Abstract:
This session shows how the Oracle Java Mission Control and Oracle Java Flight Recorder features of Oracle Java SE Advanced can be used to solve various commonly encountered production-time profiling and diagnostics problems. It also shows how various Oracle Java Mission Control plug-ins can be installed and put to good use to further extend the functionality of Oracle Java Mission Control.

Among other things, the session looks at
• Reducing memory pressure
• Maximizing throughput
• Reducing heap usage (heap waste analysis)


Looking forward to seeing you at JavaOne 2016! 🙂

/M

Using the JMC Designer View

So several people have asked me about this very unsupported feature recently. First it came up in a Google groups discussion. Then it came up again when I was helping one of the Oracle Cloud teams, and used the feature myself to modify some of the tabs to show more relevant data. And now that a colleague asked if I had a blog on how to use the JMC designer, I felt that I had to write one. So, against my better judgement, I’ll go ahead and describe, in some detail, how to use this feature in JMC 5.5.

Before we start, I would just like put in the following disclaimers:

  • Plug-ins created in JMC 5.5 will not work in JMC 6.
  • There will not be a Design view in JMC 6.
  • This is not supported functionality.

Here is the mandatory standard disclaimer:

The following blog entry will describe UNSUPPORTED functionality. This means that relying on the described APIs or functionality may BREAK your code/plugin with any given update of the JDK and/or Mission Control.

As mentioned, this disclaimer is very much applicable this time, as it is absolutely certain that this will no longer work in JMC 6.

There. I think I’ve said it plenty enough to dare continuing now.

The Designer View

Maybe you have, at times, wished that there were no dials in the Overview tab (mentioned in a Google groups discussion). Or that a certain table contained the standard deviation or max value of the aggregated events for a certain attribute (happens all the time).

Well, all but the last tab group in JMC are really customized reports that show off some specific part of the recording, usually focusing on a few different event types. And most people usually want these reports to look slightly different.

Enter the Designer View. This view is really how the rest of the JMC UI was designed. All the different tabs in JMC were created by the JMC team using the Designer View. All the tabs, except for the ones in the Events tab group, are really custom reports that highlight some aspect of the recording to help solve problems.

Starting the Designer

Starting the Designer is very easy. First open a recording. Any recording will do, but depending on what you want to do, it is good if it contains events from the event type you want to design for. Open the Designer View by hitting the Window | Show View | Designer (Unsupported) menu. Did I mention that this is unsupported?

Let’s start by removing the dials in the Overview tab. Don’t worry about messing something up – you can always reset the user interface in the preferences Window | Preferences, Java Mission Control / Flight Recorder -> Reset User Interface. That said, that extreme option will reset all your modifications to factory defaults. You can also undo changes in the design mode, which is more local and usually enough.

Here we go. Once the Designer View opens, it will show you a tree of the available tabs. In our case we want to edit the Overview. Select the General / Overview Tab, and click the “stop” button to open the Overview Tab in design mode.
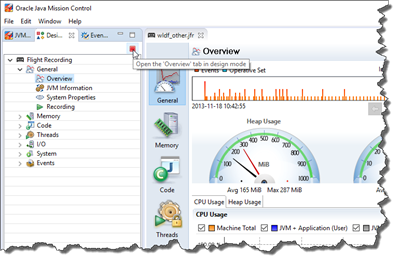
designer_init

This will show a layout view with boxes representing the different components. Bring up the context menu for one of the dials and select the Delete menu.
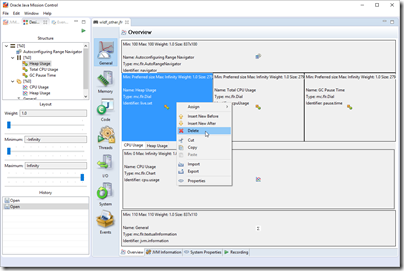
delete

Repeat this until you have deleted all the Dials, as well as the container for the dials.
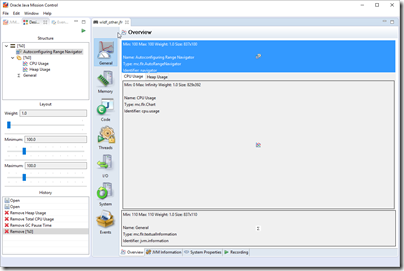
deleted

Press the play button in the Designer View to take a look at what your changes look like when live.
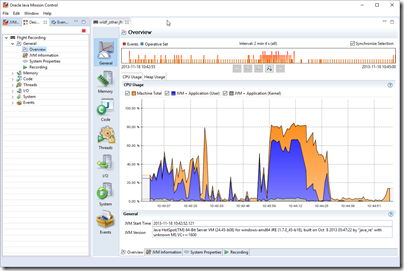
deleted_live

No more dials! Let’s take another example.

Adding Table Columns

Let’s say that you want to add some statistics for Servlet invocation events. You have the WLS tabs, but you find the Servlet tab sadly lacking in the critical-pieces-of-information department.

Note: If you do not have a WLS recording, you can download and follow this tutorial to get one. To install the plug-in, simply go to Help | Install New Software… and select the WLS tab pack.
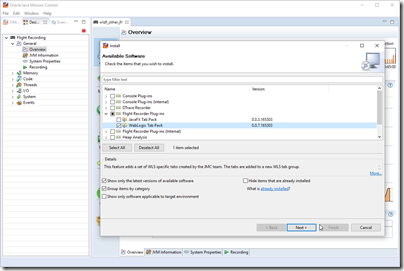
install_wls

When looking at the fabled Servlet tab, we decide that it would be very nice to see the longest lasting servlet invocations, as well as the standard deviations. First step is to open the Designer View on the Servlet tab. Right click on the Servlet Invocations by URI table (the bottom area), and select properties. You should see something like this:
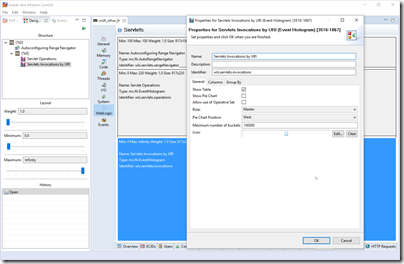
edit_servlets

Select the Columns tab. What do you know; max duration is already there, but it is not visible by default.

If you find that a table is missing a column with important information, always first check to see if the information is hidden. Go to the table, use the context menu to check what is available under Visible Columns. If there are many columns, use Configure… to see them all.
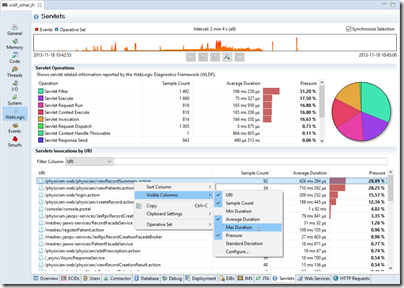
visiblecolumns 

Click max duration and check the Visible check box.
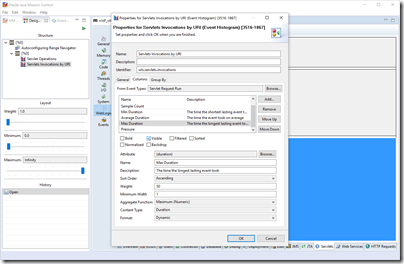
max_duration_visible

Next we will add a column for the standard deviation. Click the Add… button and select the duration attribute. Click OK in the Add Event Attribute dialog when done. Next edit the Name and Description to something meaningful, then select Standard Deviation as you aggregate function.
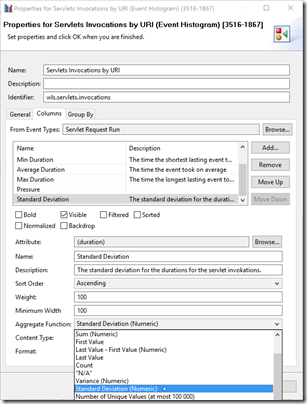
stddev

Then hit play to look at your new and now visible column. If you sort on Max Duration, it may look something along the lines of this:
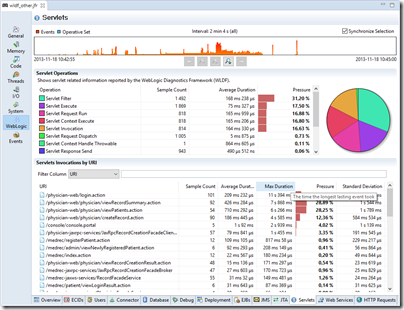
maxdurations

So, what if you want to add your own tab group? Well, let’s use the Smurfberry Exchange example from the tutorial.

Adding Tab Groups and Designing Tabs from Scratch

It is a well known fact that the Smurfs are trading smurfberries on their Smurfberry Exchange (SMX). They have performance problems though, so they have asked us for help. As part of solving their performance issue, we’ve recorded the actual transactions taking place.

For more information on the actual events recorded, see http://hirt.se/blog/?p=277. To solve their problem, look at the jmx.jfr in the tutorial and try to figure out what is going on. The jmx_fixed.jfr contains a recording when the problem is fixed.

This blog entry is however not about helping the smurfs solve their performance problem, but rather about adding a nifty UI so that we can see graphs over the exchange price development over time.

First close any open recording. Structural changes will not be seen in the UI until you have reloaded your recording(s). Next create a group by context clicking the root in the Designer View, and selecting New | New Group.
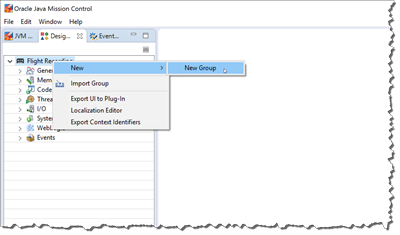
new_group

Edit your group to your satisfaction. Note that the placement path is a lexical comparison of strings. Usually the following format is used: /#1.0. I’ll just add it last.
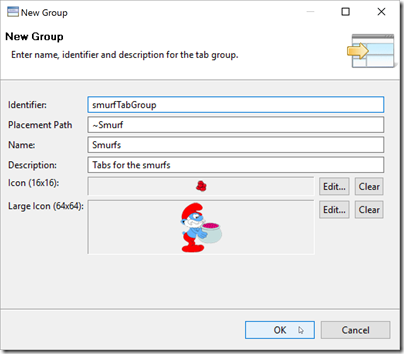
smurfgroup

Next, we want to create a tab in the tab group we just created. Context click the tab group and select New | New tab to add the tab. Fill out the New Tab wizard in a similar fashion.
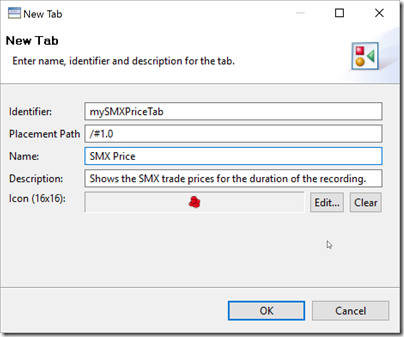
 smxpricetab

That is enough to get the structure in place. Now open the recording containing the events for wish you want to design. In this case the smx.jfr file. Our new tab will, not very surprisingly, be quite empty.
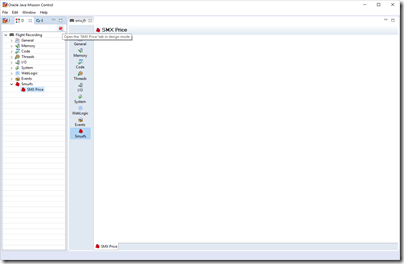
emptysmxtab

Let’s click the stop button and get to work. We want one of those nifty automatic range navigators on the top, and a big chart showing the price over time. First we fix the layout. Context click on the empty area, and select Assign | Container | Rows to split the area into two.
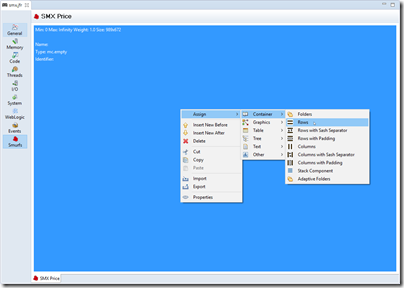
containers

The range navigators are all usually using 100 pixels, so select the upper container and set min and max to 100 pixels.
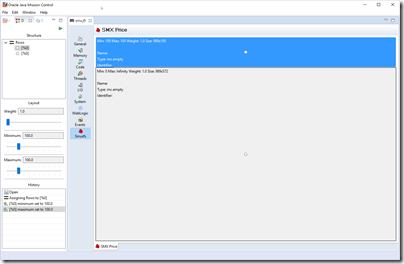
minmax

Next context click the upper container and assign it an Autoconfiguring Range Navigator (Assign | Other | Autoconfiguring Range Navigator). The Autoconfiguring Range Navigator shows where all the events that are represented on the tab are located in time, and allows the user to shift the time for all the components of the page, i.e. zoom into various parts of the recording.
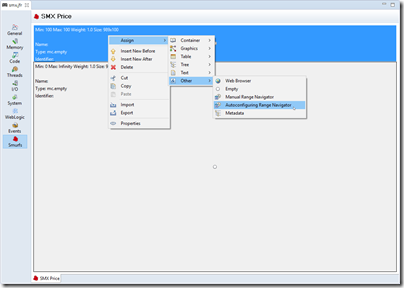
assignrangenav

Next we add the price chart. Select the lower container and use the context menu to select Assign | Graphics | Chart. You will now see the properties dialog for the newly added chart. Fill out the base properties.

The only thing of note here is the role selection. It can be used to define a relationship between a master component and a slave component. The slave will only show whatever is selected in the master. We noted that this were never done in more than three steps, so we ended up building the editor around that simple use case. A component can be a Master, Slave or a Slave Child. This is one of the reasons we never started supporting the Designer View. It was built only to be used by JMC developers to quickly build JMC itself. It can sometimes be a bit quirky.

Note that we are not slaving this chart to selections in any master component, so let the role remain Independent.

Next we need to configure the Left Y-axis, and the data series associated with that axis. We will only have one axis. Price is numeric, so the Content Type should be Number.
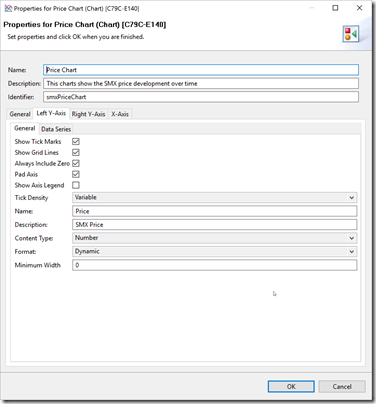
lefty 

Finally we add the price data series. Click the Data Series tab and the Add… button to add the price attribute. Note that you can type “SMX” in the filter box at the top, to quickly find the right event type to select attributes from.
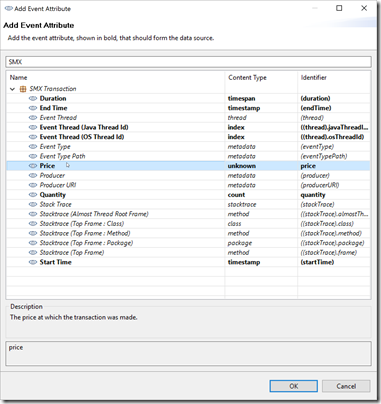
addprice

Next we configure the rendering of the price series. Select to show the legend (mostly useful for when there are multiple series, and you want the user to be able to select which ones to render by clicking the legenes). Select Line and Fill. Don’t forget to select Line (x,y) as style, and three different colors for Line Color, Top Fill Color and Bottom Fill Color, so that you get a nice gradient. 😉
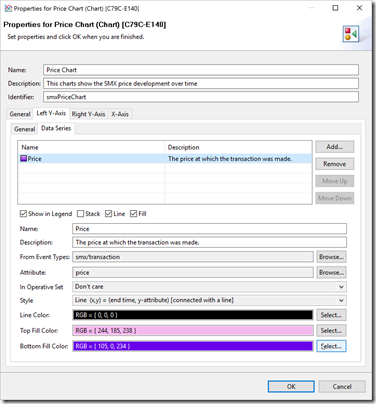
configurepriceseries

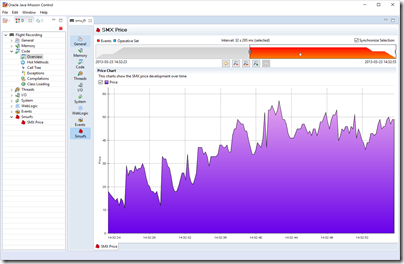
Press the play button in the Designer View to see what it all looks like, working range navigator and all.
smxfinished

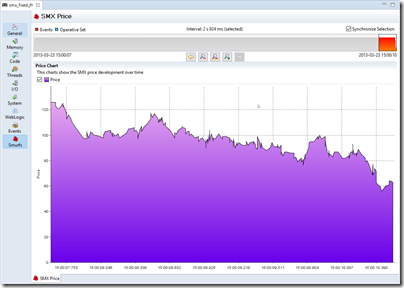
The Smurf economy seems to be doing fairly well. Prices are indeed increasing over time. Or perhaps there is a shortage of Smurfberries. Hard to tell. When looking at the recording where the performance problem has been fixed, the prices seem to falling towards the end. Could be a symptom of the smurfs effectively getting into high frequency trading after fixing the performance bottleneck. 😉
smxfixed


Saving and Sharing Designs

Now that you’ve built some amazing custom visualization, perhaps even for your own custom events, you may want to share it with others. Or even use it yourself. It is very nice to have it stored if you mistakenly press the Reset User Interface button, or if you accidentally FUBAR the user interface making it absolutely necessary to press that button. Or if you want install your changes into JMCs in multiple versions of the JDK.

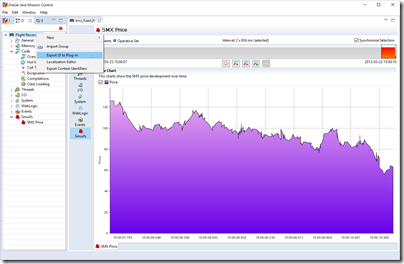
To export your design as a plug-in, simply right click on the root node in the Designer View and select Export UI to Plug-in.
export_as_plugin

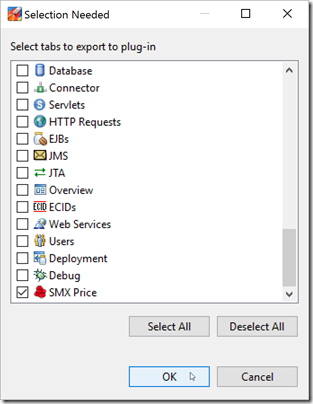
In the export wizard that opens, select the tabs to export. Note that you can select any tabs, even default tabs that you have overridden.
exporttabs

Next you get to select the ID and version of your plug-in. Higher versions will override lower versions.
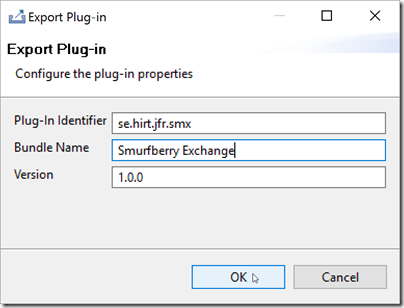
versionselect

Click OK to select where to store it. The resulting plug-in can be shared. To use it, simply add the plug-in to the JDK_HOME\lib\missioncontrol\dropins folder.

Summary

In this blog you learnt how to wreak absolute havoc on the JMC user interface. It’s not supported, so don’t come crying if/when something breaks. 😉

I’ve added the SMX plug-in here.

I will so very much regret posting this.
Recording JMX data into JFR

I recently saw a question on Stack Overflow regarding recording JMX data into JFR. I proposed that one could use the JFR Java API to record MBean attributes, but I realized I never did a blog post on dynamic events. So this blog post will be about dynamic JFR event generation, and how to write a configurable agent which you can use to periodically record declared JMX attributes into the Flight Recorder.
If you couldn’t care less about the implementation details, you can just download the agent jar and the example configuration file at the end of this article. 😉

And here is the usual disclaimer:

The following blog entry will describe UNSUPPORTED functionality. This means that relying on the described APIs or functionality may BREAK your code/plugin with any given update of the JDK and/or Mission Control.


Dynamic JFR Events

The JFR event API can be very useful to record custom events into the Java Flight Recorder. But what do you do when you do not know beforehand what fields the event needs to contain? Or if you wish to programmatically generate event types based on some input?

Dynamic JFR events to the rescue. You will, as usual, need a Producer:

Producer p = new Producer("Dynamic Event Example", "This example will generate a dynamic event over and over", "http://www.hirt.se/example/dynamic/");

Next you need to create your DynamicEventToken. This token is what you will later use to create your events.

token = p.createDynamicInstantEvent("Dynamic Event Name", "Dynamic event description", "dynamic/path", true, true,
    new DynamicValue("rndstr", "Random String", "Contains a random string", ContentType.None, String.class),
    new DynamicValue("fraction", "Random Fraction", "Contains a random fraction between 0 and 1", ContentType.Percentage, Float.TYPE),
    new DynamicValue("timestamp", "Timestamp", "Contains a timestamp", ContentType.Timestamp, Long.TYPE));

Don’t forget to register the producer! Also note that there is one DynamicValue per attribute to record. The ContentType is used to provide the data consumer (usually JMC) with a hints for helpful visualization of the data. Check out the jmxprobes.xml file for more information on the ContentTypes.

Here is the full source for an example recording dynamic events of the same event type, but different payloads, over and over again:

package se.hirt.jmx2jfr;

import java.util.Random;

import com.oracle.jrockit.jfr.ContentType;
import com.oracle.jrockit.jfr.DynamicEventToken;
import com.oracle.jrockit.jfr.DynamicValue;
import com.oracle.jrockit.jfr.InstantEvent;
import com.oracle.jrockit.jfr.Producer;

@SuppressWarnings("deprecation")
public class DynamicExample implements Runnable {
	private static final Random RND = new Random();
	private final DynamicEventToken token;

	public DynamicExample() throws Exception {
		Producer p = new Producer("Dynamic Event Example", "This example will generate a dynamic event over and over", "http://www.hirt.se/example/dynamic/");
		token = p.createDynamicInstantEvent("Dynamic Event Name", "Dynamic event description", "dynamic/path", /* record thread */ true, /* record stack trace */true,
				new DynamicValue("rndstr", "Random String", "Contains a random string", ContentType.None, String.class), 
				new DynamicValue("fraction", "Random Fraction", "Contains a random fraction between 0 and 1", ContentType.Percentage, Float.TYPE),
				new DynamicValue("timestamp", "Timestamp", "Contains a timestamp", ContentType.Timestamp, Long.TYPE));
		p.register();
	}

	public void run() {
		while (true) {
			InstantEvent e = token.newInstantEvent();
			e.setValue("rndstr", randomString());
			e.setValue("fraction", RND.nextDouble());
			e.setValue("timestamp", System.currentTimeMillis());
			e.commit();
			sleep(1000);
		}
	}
	
	public final static void main(String[] args) throws Exception {		
		Thread t = new Thread(new DynamicExample(), "Event generation thread");
		t.setDaemon(true);
		t.start();
		System.out.println("Press enter to exit!");
		System.in.read();
	}
	
	private static String randomString() {
		StringBuilder builder = new StringBuilder();
		for (int i = 0; i < RND.nextInt(10) + 1; i++) {
			builder.append(Character.toString((char) (RND.nextInt(26) + 64)));
		}
		return builder.toString();
	}
	
	private void sleep(long millis) {
		try {
			Thread.sleep(millis);
		} catch (InterruptedException e) {
		}
	}
}

To run the example, especially if on a JDK prior to 8u40, remember to start with:

-XX:+UnlockCommercialFeatures –XX:+FlightRecorder

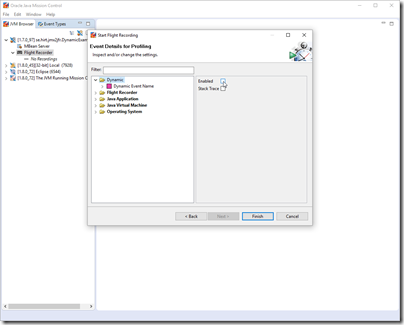
To make a recording, start JMC and hook up to the running process. Don’t forget to enable the events!

enable_dyn_events

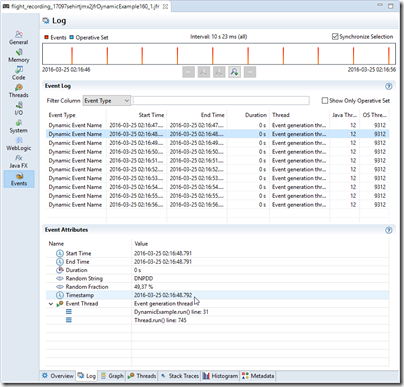
If you do a 10 second recording, you should have recorded about 10 events. Notice that properly setting the content type allows JMC to present the information in a better way. See, for example, the timestamp field:

generatedevents


Using the Agent

The agent allows you to configure and record JMX data into JFR without having to change any code. There is a small test snippet that you can run in the agent jar to try it out (download the agent and the settings file from the end of this article):

java -XX:+UnlockCommercialFeatures -XX:+FlightRecorder -javaagent:jmx2jfr.jar=jmxprobes.xml -cp jmx2jfr.jar se.hirt.jmx2jfr.test.HelloWorldTest

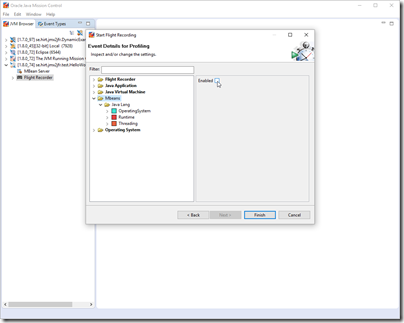
Next hook up to the HelloWorldTest process from JMC and create a 10s recording. Don’t forget to enable the MBean events:

enablembeanevents

When the recording finishes, go to the Events | Log tab. Select to only see the MBean events in the Event Types view, and select an event. You will see that MBean data has been recorded from the platform MBean server.

mbeanslog

Use the configurations file to configure what MBeans and attributes to record, and what content types to use for the different attributes. There will be one Event Type per MBean, filled with whatever attributes you have selected:

<jmx2jfr>
        <!-- Time to wait before retrying getting an MBean attribute in ms -->
	<retrytime>60000</retrytime>
	
	<!-- Time to wait until starting in ms --> 
	<delay>10000</delay>
	
	<!-- How often to get the attributes and emit events for them, in ms -->
	<period>1000</period>
	
	<!-- clean: Use name or type keys for event name. Leads to cleaner event 
	     type names, but can result in name collisions if you have MBeans with 
	     the same name in the same domain.
	     canonical: ugly event type names, but guaranteed not to collide -->
	<namingmode>clean</namingmode>
	
	<!-- objectname:    MBean name - look it up in JMC
	     attributename: Attribute name - look it up in JMC
	     contenttype:   [None | Bytes | Timestamp | Millis | Nanos | Ticks | Address] -->
	<attributes>
		<attribute>
			<objectname>java.lang:type=OperatingSystem</objectname>
			<attributename>FreeSwapSpaceSize</attributename>
			<contenttype>Bytes</contenttype>
		</attribute>
		<attribute>
			<objectname>java.lang:type=OperatingSystem</objectname>
			<attributename>TotalSwapSpaceSize</attributename>
			<contenttype>Bytes</contenttype>
		</attribute>
...

This should be fairly self explanatory. Edit the file to get the MBean attributes that you are interested in.

Summary

TL;DR – agent to easily record data from the platform MBean server into the Flight Recorder. Just edit the xml settings file, add the agent to the command line and point it to your edited settings file.

Downloads:

Twins!

So, this is quite old news. Well, 8 weeks to be precise. Not to mention that it really has nothing to do with Java or programming. That said, I felt I should put something here on the blog. The 12th of December Malin (my wife) gave birth to two healthy babies: Sebastian and Julia.

Sebastial left, Julia (yawning) right. Both a few days old. Julia left, Sebastian right. Both a few days old.

The past few weeks have been difficult but rewarding. Very few things beat having two infants snoozing on your chest. That said, last week was hell, with the entire family sick. Now everyone is more or less well, but Julia is still fighting her cold. Since human infants are obligate nasal breathers, she gets  terrified once in a while when she can’t breathe through her nose.

Both Malin and I are a bit sleep deprived at this point. Can’t wait for them to sleep for larger continuous periods of time. Just a few months to go *fingers crossed*… Zzzzzzz…

Splitting Flight Recorder Files

Flight recorder is most commonly used to dump the last few minutes of data. Either by doing a profiling recording for a minute or so, or by having a continuous recording which is later dumped when some anomaly was discovered using a monitoring tool, for example the JMC JMX console.

Sometimes though, people bring me enormous recordings. Now, enormous recordings are not handled well in JMC. Most of the time, JMC will discover that you are trying to open something that is too large, and prompt you for what subset of the recording you want to open. 

rl5di

Sometimes it is easier to simply split the recording into smaller recordings instead.

Here is a small tool that can be used for splitting flight recordings:

split.jar

Usage:

java -jar split.jar filename [targetSizePerFile in MiB (default 50)]

Note that the jfr file will be split along chunk boundaries using a best effort algorithm. The individual files will be as close to the specified target size as the chunk boundaries allow.

Let me know if you run into trouble! 🙂

The BMP-180 Pressure Sensor

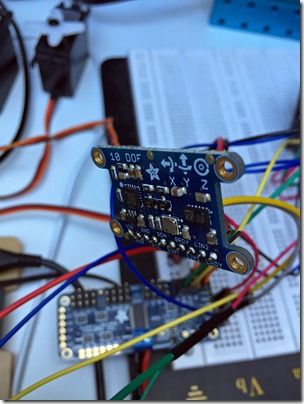
For detecting small altitude changes, reading the barometric altitude, or for just detecting changes in pressure, you may want to use a pressure sensor. The Bosch BMP-180 is a very reasonably priced one, which is accessed over I2C. There are several nice breakout boards available from Adafruit.featuring the BMP-180. There is, for example, one featuring only the BMP-180, and another one featuring gyros and accelerometers as well.

BMP

No matter which, you would access it in a similar fashion.

As usual, before you start, you need to install PI4J and set up the Rasberry for i2c communication.

Next decide in which mode you want the device to run. Check out the OperatingMode for details. The higher resolution, the longer time it takes to read values, and the higher the current draw.

If you are using the standard address and i2c bus, next create a BMPDevice:

BMPDevice bmp = new BMPDevice(OperatingMode.STANDARD);

Next, reading the pressure, altitude and temperature is done like this:

System.out.println(String.format(“Temperature: %.1fC, Pressure: %dhPa, Altitude: %.1fm”,
        bmp.readTemperature(),
        bmp.readPressure() / 100,
        bmp.readAltitude()));

To run the standard example, which will print the above every two seconds:

sudo java -classpath .:classes:/opt/pi4j/lib/*:./bmp.jar se.hirt.pi.adafruit.bmp.test.BMPTest

Summary

The Bosh BMP-180 is an easy way to measure the barometric altitude and/or changes in pressure.

Java Mission Control 5.5.0 Released!

The latest version of Java Mission Control was released a few moments ago, together with Oracle Java SE 8u40. It’s a minor release; most of the development is taking place in the upcoming major version of JMC, but there are nevertheless some interesting features and fixes in this release. I have selected a few of the highlights below.

Dynamic Enablement of Java Flight Recorder

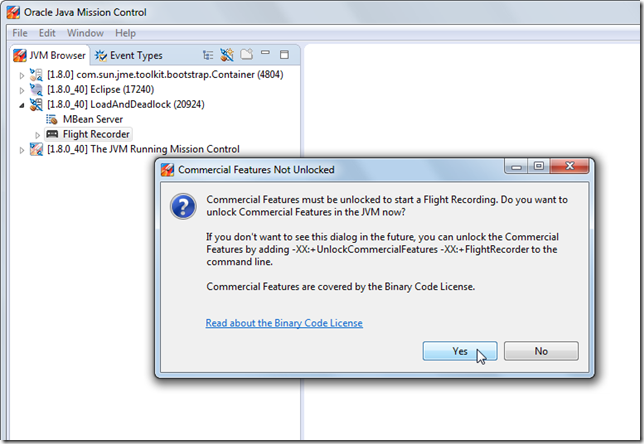
If you forgot to enable flight recorder on the command line (in 8u40 and later), all is no longer lost – JFR can be enabled dynamically, after the fact that the JVM process has been started! If you try to connect to a JVM which has not enabled JFR, you will be presented with a dialog like this:

dynamic

Clicking yes will dynamically enable the Flight Recorder and allow you to start recordings.

JMC Now Using Eclipse RCP 4.4

Up until now we have based the JMC RCP application on Eclipse RCP 3.8.2. The reason was due to a performance problem when running with Eclipse RCP 4.x. For JMC 5.5.0 we worked around this problem, and are now using Eclipse RCP 4.4. As a result, JMC will also feel much snappier when running inside of Eclipse, as a set of Eclipse plug-ins.

Upgrading to Eclipse 4.4 affects many different parts of the stand-alone JMC application. For a starter, plenty of bugs have been fixed in the platform over the past years. Fixes that JMC can now take advantage of. Also, various enhancements done to the platform are now available, such as themes:

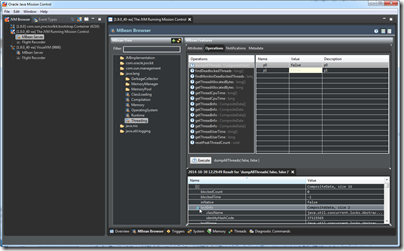
darkjmc

It is supported to run JMC in the very latest version of Eclipse, and the speed should be comparable to running in Eclipse 3.8.2.

JMC Plug-ins Are Now Signed

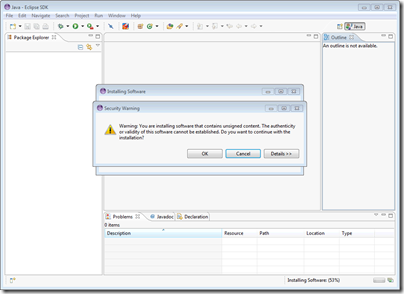
JMC can be used as a set of plug-ins in Eclipse. This has the added benefit that you can jump to your source code from anywhere we display a class, or a method frame or similar. There is also an experimental update site from where you can install extra JMC content, for example the WebLogic Server plug-in, or the D-Trace plug-in. Previously all the JMC plug-ins were unsigned. Installing them into Eclipse required you to accept to install unsigned content into your Eclipse:

unsigned

This is no longer the case.


JMC Friendlier to Users of Dynamic Languages

Looking at recordings from applications running in implementations of dynamic languages making heavy use of Lambda Forms will be much friendlier. Say, for example, a recording of a Java Script application running on Nashorn. Just like the JVM by default hides @hidden annotated Lambda Form methods, so will JMC. If you still want to see them in all their glory, the setting can be toggled in the preferences.

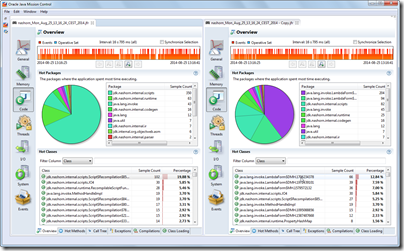
Here is a picture of the same recording opened twice – to the left opened with @hidden annotated methods hidden, and to the right with @hidden annotated methods visible:

hiddenlambdaforms

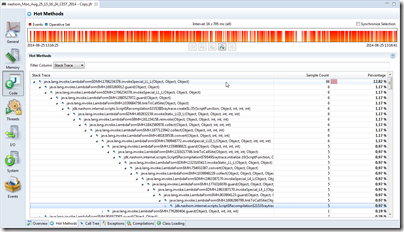
And here is what a stack trace can look like with them visible:

hiddenshowing

Suffice it to say, you will usually want to leave them hidden… 😉


Bugfixes

  • Performance workarounds for certain CTabFolder related Eclipse bugs, which allows us to run faster in Eclipse 4.x
  • Numerous bugs fixed from upgrading to a newer version of the platform
  • The JMX Console no longer assumes it is connected to the platform MBean server – any MBean server should be okay, and functionality degraded gracefully
  • JMC no longer assumes that projects are physically located in the workspace when running in Eclipse
  • When jumping to source from a stack trace in the JFR UI, you will end up on the correct line number (previously you always ended up in the method declaration, even when aggregating per line number)
  • You can now use the –vmargs flag to append JVM arguments when launching JMC. Previously –vmargs would replace all JVM arguments


Summary

  • Yay, JMC 5.5.0!
  • Yay, Java SE 8u40!

The Adafruit Ultimate GPS

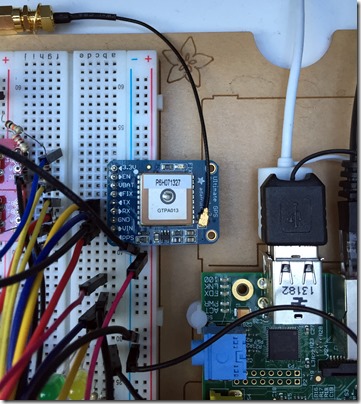
This blog will provide a tiny library for communicating with the Adafruit Ultimate GPS board from Java SE Embedded. I only implemented UART communication, but it is trivial to adapt the code for use over the USB serial, should you want to. The library provides position information as well as speed, as GGA and VTG was the only info I need (right now). As usual, first install PI4J before attempting to use the library.

GPS

Here is how to use the thing:

GPS gps = new GPS();
gps.addListener(new GPSListener() {
    @Override
    public void onEvent(PositionEvent event) {
        System.out.println(event);
    }

    @Override
    public void onEvent(VelocityEvent event) {
        System.out.println(event);
    }
});


That’s it. The PositionEvent will provide you with the 2D location, the altitude about mean sea level, the altitude above the ellipsoid, an estimate of the max error, number of satellites used for the fix etc. The VelocityEvent will provide the heading and ground speed. Hope this helps!


Summary

Almost all projects are improved by a GPS. 🙂 This tiny library makes it easy to access the Adafruit GPS from Java SE Embedded. Here are the links:

Reading JMX Metrics

I found this question on Stack Overflow about how to connect to a locally running process and read JMX metrics. I thought I’d explain a little bit more in detail here on the blog. The steps involved are:

    1. Try to get the JMX Service URL for the local JMX agent.
    2. If you couldn’t, try to start the local JMX agent.
    3. Open an MBeanServerConnection to the local JMX agent.
    4. Do whatever MBean-ish stuff you were planning on doing, for example reading attributes.

This is pretty much as simple as it sounds. Let’s do them in order.

Getting the Service URL

When the local management agent is started, it publishes the service URL (which also contains the serialized stub for communication – take a look at the URL, it’s really quite funny) in a well known location. This can be retrieved by using the sun.management.ConnectorAddressLink class like this:

private static JMXServiceURL getLocalStubServiceURLFromPID(int pid)
        throws IOException {
    String address = ConnectorAddressLink.importFrom(pid);
    if (address != null) {
        return new JMXServiceURL(address);
    }
    return null;
}

If you didn’t get any service url, then the local management agent was not started.

Starting the Local Management Agent

Starting the local management agent can be done in various ways. In late versions of the JDK this is quite easily done. I am only going to show you the simple way today. In older you might need to resort to the attach command to load java agents (VirtualMachine vm = VirtualMachine.attach(pid).loadAgent(<path to management-agent.jar>,”com.sun.management.jmxremote”)).

To start the local agent, we simply execute the diagnostic command for starting it:

executeCommandForPID(vm, pid, “ManagementAgent.start_local”);

private static void executeCommandForPID(VirtualMachine vm, String pid,
        String cmd) throws IOException {
    HotSpotVirtualMachine hsvm = (HotSpotVirtualMachine) vm;
    hsvm.executeJCmd(cmd);
}


Opening the MBeanServer Connection

This, as well as doing the MBeany things you want to do once you have the connection, is done just as you would normally do it:

JMXConnector jmxc = JMXConnectorFactory.connect(url, null);
MBeanServerConnection connection = jmxc.getMBeanServerConnection();

Getting attributes:

connection.getAttribute(“java.lang:type=Memory”, “HeapMemoryUsage”);


Summary

    • Hooking up to the local management agent is quite easy.
    • There are valuable metrics that can be collected.
    • Here is a full example getting the JVM CPU load as well as used heap.